 To Delete a To Do Item
Click the To Do Editor icon to open it.
Select the To Do item in the To Do list.
Click Delete.
Click Cancel to close the editor.
 To View a To Do List
This section describes how to create a list of To Do items and display it on your system. If you want to print your To Do list, see "Printing Calendars, Appointment, or To Do Lists".
Display the view of the calendar that you want the To Do list to show.
Choose To Do List from the View menu.

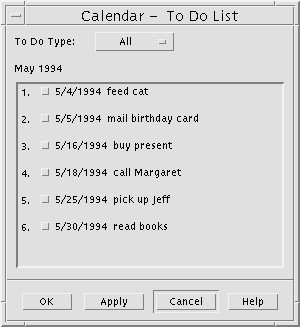
To Do items are listed chronologically and show a check box beside each item, due date, and description. For example, if you are viewing by day, the To Do List displays the day's To Do items.
Marking To Do Items Completed
Calendar keeps track of the state of To Do items: whether they're completed or pending. In the To Do List dialog box, you can choose to display all To Do items, only completed items, or only pending items.
If you make a To Do list and then want to check off an item on the list, use one of the two methods described below.
 To Mark an Item Directly in the To Do List
Choose To Do List from the View menu.
Click the check box beside the To Do item you've completed.
Click Apply or OK.
This changes the item's state to completed.
To return the item's state to pending, click the check box again and apply your changes.
 To Use the To Do Editor To Mark an Item
Click the To Do Editor icon.
Select the To Do item in the To Do list.
Click Completed to mark the item completed.
To return the item's state to pending, click Completed again.
Click Change.
This changes the item's state to completed.
Click Cancel to close the To Do Editor.
Printing Calendars, Appointment, or To Do Lists
You can print any of the four Calendar views, plus appointment and To Do lists. Calendar uses the default printer settings when you choose Print Current View from the File menu. To customize printer settings, see "To Change the Printer Settings for Future Print Jobs".
 To Print Current Day, Week, Month, or Year Views
 To Print Your Appointment or To Do List
Display the Calendar view containing the day for which you want to print an appointment or To Do list.
Select that day.
Choose Print from the File menu.
The Print dialog box is displayed.
Choose Appointment List or To Do List from the Report Type menu.
Specify a printer in the Printer Name field.
Click Print.
 To Change the Print Options for a Single Print Job
Choose Print from the File menu.
The Print dialog box is displayed.
Double-click in the Printer Name field to select the contents and type a printer name.
Choose the view or list you want to print from the Report Type menu.
Click the arrows next to the Copies field to adjust the number of copies to be printed or type the number.
Optional. Change the range of time to print in the From or To fields.
Optional. Add printer options in the Print Command Options field.
For example, to save paper, you may want to specify -o nobanner to suppress header pages.
To print Calendar data to a file instead of to a printer, select Print to file.
Click again on this setting to deselect it.
Edit the file name, if desired.
Click Print.
Click Close to close the Print dialog box.


