Basic Dtpower Settings and Configurations
This section describes the Dtpower GUI and the associated conventions. This section also explains the preset power-saving schemes for Dtpower.
Accessing Dtpower
In previous releases, you needed superuser permissions to start Dtpower and then edit the configurations. In this release, you can start the program in a number of ways, all of which enable you to change the configurations.
Note - If you are unable to access Dtpower for editing purposes, you might not have the correct permissions. See the dtpower(1M) man page for details.
If Dtpower is already running, the program might appear on your desktop as the following icon:
Figure 23-1 The Dtpower Icon
 To Start Dtpower Through the CDE Workspace
On the CDE desktop, hold down the menu button on your mouse.
From the pull-down list, select Tools.
From the pull-down list, select Power Manager.
 To Start Dtpower From the Applications Manager
From the front panel on the CDE desktop, select Applications Manager.
From Applications Manager, select Desktop_App.
From Desktop_App, select Power Manager.
 To Start Dtpower From the Command Line
Note - Due to system initialization, Dtpower can take some time to launch.
Overview of the Dtpower GUI
Basic Dtpower Window Controls
Every Dtpower window has one or more of the following buttons:
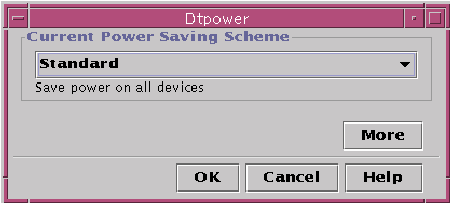
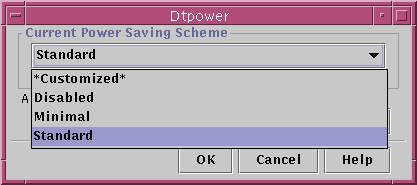
A triangle indicates a pull-down menu. In the Dtpower basic window, you can pull down the Current Power Saving Scheme box to reveal two additional levels of power management: Minimal and Disabled.
OK puts into effect the settings currently displayed in the window.
Cancel reverses settings to one of the following states:
The state they were in when OK was previously selected.
The default values if this is the first time you have run Dtpower.
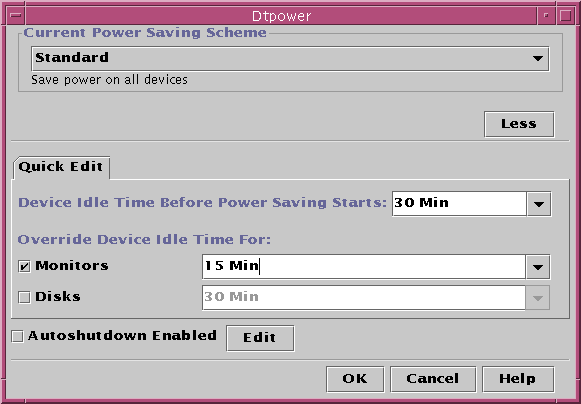
More expands the window to reveal the full options for editing the idle time for the system, monitors, and disk drives.
Less reduces the window to conceal the options revealed through the More button.
Edit is located in the Quick Edit tab, (see Figure 23-5. Edit opens a window in which you can configure the AutoShutdown and AutoWakeup options.
Figure 23-2 The Dtpower Basic Window

Power Saving Schemes
The simplest way to select a level of power management for your system is to choose one of the preset power saving schemes. The schemes appear in the Current Power Saving Scheme box in the Dtpower basic window. The default scheme is Standard, as shown in Figure 23-2.
The implementation of the power saving schemes depends on the architecture and the Energy Star capability of the hardware that is running Dtpower.
The implementation of the power schemes depends on the power saving capabilities of your hardware. In addition to the schemes described below, you can also modify any one of these schemes and save the scheme as a Customized scheme. For more information on creating a customized power saving scheme, see "Customizing Power Schemes".
The available power schemes are:
Standard scheme - The default Power Management settings of your hardware determine the implementation of the Standard scheme. SPARC platforms that are Energy Star 3.0 compatible, for example, reduce power consumption by entering a power-saving mode for all devices.
Minimal scheme - Manages power for monitors only. The monitor goes into power-saving mode after 30 minutes of idleness. This scheme does not perform power management for any other devices.
Disabled scheme - No power management. This scheme does not perform power management for any of the components of the system.
 To Select a Power-Saving Scheme
Start Dtpower.
This launches the Dtpower basic window.
From the pull-down list in the Current Power Saving Scheme box, choose a scheme.
Figure 23-3 Pulldown List of Power Saving Schemes

Click OK.
Note - Some schemes in the pull-down list might be grayed out. You might be unable to select these schemes because you do not have the required permissions.
Customizing Power Schemes
This chapter explains how you can create a customized power scheme, overriding the schemes that come preset in the Dtpower software.
You cannot overwrite the schemes that the system provides, but you can create a customized scheme. When you change a system-shipped scheme, a new scheme called "Customized" is created. When you edit another scheme, the first Customized scheme is overwritten by the new one. Thus, you can only save one customized scheme at any time.
The Customized scheme remains the default scheme even if you reboot your system. The Customized scheme only remains in the system until you select one of the three preset schemes. When you select a preset scheme, the Customized scheme is deleted and removed from the pull-down list of available schemes.
Power Management of Overall System
The system idle time defines the length of time for which the CPU and the devices connected to your system must be idle before they power down. Although you can use the GUI to assign only one idle time for all devices and the CPU, the idle time of each device is measured separately. If a system has two external hard drives, for example, and you are only using one of them, the other drive switches to power-saving mode after 30 minutes of idleness. The first drive switches to the power-saving mode separately, after an idle time of 30 minutes.
For information on configuring a different idle time for each device, refer to the power.conf(4) man page.
 To Change System Power Management
Start Dtpower.
This launches the Dtpower basic window:
Figure 23-4 The Dtpower Basic Window

In the Dtpower basic window, select More.
The Quick Edit tab is displayed.
Figure 23-5 Quick Edit Tab

From the pull-down list for Default System Idle Time, choose the amount of time you want all the devices to be idle before powering down.
You can also type in the system idle time.


