


This chapter contains the following topics:
 |
To Start the SunForum Software
|
 |
Type the following at your system prompt:
|
Note - If the SunForum directory is not set in your path, enter the correct path name (for example, /opt/SUNWdat/bin/sunforum).
The SunForum conference manager is displayed. When you start SunForum for the first time, however, the My Information window is displayed.
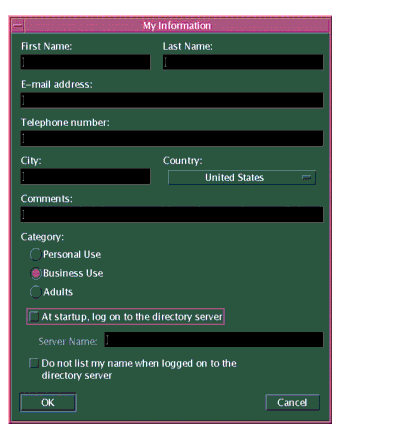
FIGURE 2-1 My Information Window
| |
Type your name and email address in the My Information window.
|
Note - You must enter your name and email address. You cannot collaborate unless this minimum information is entered.
The next time you start the SunForum software, the My Information window will not display automatically. However, you can change the information in the My Information window anytime by choosing Call  Change My Information to open the information window.
When completing the My Information window, the Configuration Wizard window is displayed for configuring audio/video.
When complete, the SunForum conference manager is displayed as the active window.
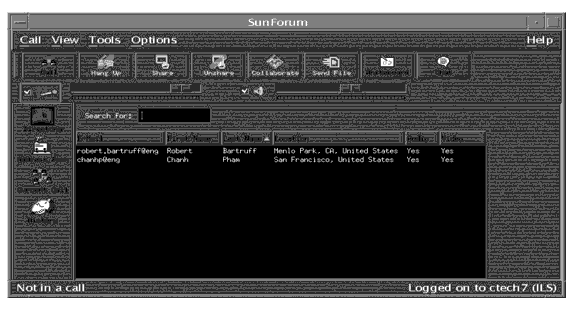
FIGURE 2-2 SunForum 3.1 Conference Manager
There are four menus on the SunForum menu bar: Call, View, Tools, Options, and Help.
Note - You can also use the SunForum conference manager buttons to access most of the functions in the Call, View, and Tools menus. See Using the SunForum Software for more information.
Call Menu
TABLE 2-1 Call Menu
Menu
|
Description
|
|
Place Call
|
To place a call to an indicated address. You can also click the Call button.
|
|
Stop Placing Call
|
To cancel an in-progress call request.
|
|
Host Conference
|
To start a conference.
|
|
Hang Up
|
To end your call. (Same as clicking the Hang Up button.)
|
|
Do Not Disturb
|
To block incoming calls. You may, however, call out.
|
|
Create SpeedDial
|
To create speed dial files for use in your address book or for exchange with other users.
|
|
Run In Background
|
To allow SunForum to continue running in the background when you exit.
|
|
Log On To Directory Server
|
To log in to a directory server. You will be prompted for the server name.
|
|
Change My Information
|
To make changes to your profile information.
|
|
Address listing
|
To call recently accessed addresses.
|
|
Exit
|
To exit or place in background the current SunForum session.
|
View Menu
You can use the View buttons to change these listings viewed in the SunForum conference manager.
TABLE 2-2 View Menu
Menu Item
|
Description
|
|
Compact View
|
To turn the Conference Manager into menu bar.
|
|
Always On Top
|
To cause the Conference Manager window to always be on top.
|
|
Directory
|
To view the directory server. It lists who you can conference with.
|
|
Address Book
|
To display addresses that you have conferenced with and added to your address book.
|
|
Call Status
|
Use during a call to view the status of conference participants and the status of the application sharing, whiteboard, and chatting features.
|
|
History
|
To list the status of received calls.
|
|
Refresh Directory
|
To query the directory server for an immediate update of the directory listings.
|
|
Call Information
|
To view audio/video bandwidth usage in the current call.
|
Note - To remove an item from the Address Book and History lists, select the item and press the Delete key.
Tools Menu
TABLE 2-3 Tools Menu Descriptions
Menu Item
|
Description
|
|
Video
|
To select video windows to be displayed.
|
|
Configuration Wizard
|
To start the Configuration Widard program.
|
|
Share Application
|
To share your applications with others on the call. A submenu lists the shareable applications you have running on your desktop.
|
|
Share
|
To select an application window on your desktop for sharing. (Same as clicking the Share button.)
|
|
Unshare
|
To unshare the application. (Same as clicking the Unshare button.)
|
|
Collaborate
|
To shift a shared application from view-only to collaborate. When you collaborate an application, you enable others to take control of the application. (Same as clicking the Collaborate button.)
|
|
Send File
|
To select a file to send to everyone in the conference. (Same as clicking the Send button.)
|
|
Cancel All Sends
|
To cancel sending of files.
|
|
Cancel All Receives
|
To cancel receipt of files.
|
|
Shared Desktop Viewer
|
To show an overview of all user desktops and the location of shared applications.
|
|
Whiteboard
|
To start the whiteboard graphical application. The whiteboard automatically starts on other user systems in the conference. (Same as clicking the Whiteboard button.)
|
|
Chat
|
To start the chat application. The chat window automatically starts on other user systems in the conference. (Same as clicking the Chat button.)
|
|
Share Clipboard
|
To copy and paste clipboard data between systems.
|
Options Menu
TABLE 2-4 Options Menu Descriptions
Menu Item
|
Description
|
|
Call Settings
|
To configure SunForum options for handling calls.
|
|
Tool Settings
|
To configure general SunForum options.
|
|
Audio/Video Settings
|
To configure Audio/Video conference attributes.
|
|
Audio/Video Device Settings
|
To configure the Audio input and output devices and Video input device, including the Sun 1394 Camera.
|
Help Menu
You can access help from the Help menu, located on the SunForum menu bar. Choose Help Help Topics for online SunForum information.
Note - The Help Topics menu is on each of the SunForum window menu bars.
To log in to a directory, you must specify your own details, including name, location, and email address. You are prompted for these details the first time you run SunForum. You can choose whether to list these details for access by everyone; if you do not, then only those people who know your email address will be able to call you via the directory.
This section contains the following topics:
- To Change Your Directory Information
- To Log in to a Directory Server
- To Refresh the Directory List
- To Automatically Log In to a Directory Server at Startup
- To Remove Your Name from the Directory Server
- To Call Someone in the Directory List
- To Call Someone on a Directory Server Using Their Email Address
| |
To Change Your Directory Information
|
| |
1. |
Choose Call Change My Information. |
| |
|
The fields that you need to fill in are: |
- First Name and Last Name. This is the name used to identify you in a conference.
- email address. This is used to identify you when you are logging on at a directory server.
- Category. This is used by servers to narrow down the list of names they see when querying or choosing a directory server.
| |
2. |
Change the details as required and click OK. |
| |
To Log In to a Directory Server
|
| |
1. |
To view the directory listing, choose Call Log On To Directory Server. |
| |
2. |
Enter the name of the directory server you want to log in to and click OK. |
| |
|
When SunForum has successfully logged in to the directory server, the server is automatically queried for other users also logged in to that directory. |
To log out from a directory server: choose Call Log Off From Directory Server.
Note - You may configure an LDAP server as a SunForum directory server. To do this, refer to the SunForum 3.1 Help for these system administrator procedures.
| |
To Refresh the Directory List
|
| |
Choose View Refresh Directory.
|
This option can be selected only when the directory list is displayed.
| |
To Automatically Log in to a Directory Server at Startup
|
| |
1. |
Choose Call Change My information. |
| |
2. |
Select "At startup, log in to the directory server." |
| |
3. |
Type the name of the directory server you want to log in to in the Server Name field. |
| |
|
The next time you start SunForum, it will log in to the directory server you specified. |
| |
To Remove Your Name from the Directory Server
|
| |
1. |
Choose Call Change My Information. |
| |
2. |
Select "Do not list my name when logged in to the directory server." |
| |
|
The next time you log in to a directory server, your details will not be visible to users browsing the directory. |
If you are currently logged in and your name is displayed when you select this option, SunForum automatically updates your entry at the directory server so that your name is not displayed.
| |
To Call Someone in the Directory List
|
You can call a user shown in the directory list by double-clicking on that entry in the directory view.
Note - If Add to address book in the Place Call window (Call Place Call) is selected, any users you call via the directory list will be added to the address book list.
| |
To Call Someone on a Directory Server Using Their Email Address
|
The SunForum software enables you to call someone who is logged in to a directory server by specifying their email address.
| |
Type the name of the directory server they are logged in to and the user email
address, separated by a slash (/).
|
The SunForum software queries the specified directory server for a user with the email address you entered. If the user is logged in to the directory server, SunForum tries to start a call with them.
Refer to the SunForum conference manager as you read the procedures in this section.
This section contains the following topics:
- To Make a Call
- To Share Applications
- To Unshare Applications
- To Collaborate Applications
- To Transfer Files
- To Chat
- To Transfer Data Using the Shared Clipboard
Manual Connection
| |
1. |
Choose Call Place Call, or click the Call button. |
| |
|
The Place Call window is displayed. The Place Call window enables you to join a conference. |
| |
2. |
Type the address with which you want to conference. |
| |
|
In the Place Call window, you can add the address you are calling to your Address Book. You can also specify a named meeting to join (for example, if you are calling a conference server). |
| |
|
The view will shift to Call Status if the connection is made, or a prompt will inform you why the attempt was unsuccessful. |
To Make a Call
Quick Connection
| |
1. |
Choose View Address Book, or click the Address Book button. |
| |
2. |
Double-click on the address book entry that you want to connect. |
| |
|
You can also simply click the Directory or History view buttons and double-click the entry you want to connect. |
Ending a Connection
| |
Choose Call Hang Up, or click the Hang Up button.
|
| |
|
This ends your participation in a conference. |
Note - When you hang up, you may also disconnect others from the conference. This includes all the participants you invited into the conference, or anyone who called you. If you initiated the conference, the whole conference will be terminated. You will get a warning message if you are about to disconnect others by hanging up.
| |
To Share Applications
|
When you are using the SunForum software, the applications on your entire desktop screen can be shared with other conference participants. This results in the following:
- If a controlling user within a SunForum conference moves an application window on their desktop, it is actually moved on the host desktop. Other applications on the host desktop may obscure the window being shared. If a portion of the shared application window is obscured on the host desktop, that same portion is also obscured on the controlling user's desktop.
- Sun and PC desktops in a SunForum conference may have different desktop screen sizes. When controlling users move shared windows around on their desktop, the windows may move outside the viewing area of a user in the conference with a smaller desktop screen. A participant with a smaller desktop screen can move (scroll) the active (view) region of the screen by moving the mouse pointer to that area of the desktop where the entire application can be viewed. (To set the scrolling feature, choose Tools Options from the SunForum conference manager.)
| |
1. |
While in a conference call, choose Tools Share, or click the Share button. |
| |
|
Or, choose Tools Share Application to select the application you want to share. |
| |
2. |
Place your mouse pointer (now a hand symbol) over the desktop application window you want to share. |
| |
3. |
Click anywhere in that application window. |
All conference participants can now see that application on their system as if it were running locally. SunForum can share almost any application, including terminal windows, word processors, and CAD design packages. Exceptions include SunForum and applications using certain X extensions that are not supported.
Note - The window is labeled with the name of the user who shared the application. At this point, only that person can control it; others can only view the output on their desktop.
| |
To Unshare Applications
|
| |
1. |
Choose Tools Unshare, or double-click Unshare, to stop sharing the application. |
| |
2. |
Click on the application window that was being shared. |
| |
|
Now, only you can view and control that application. |
| |
To Collaborate Applications
|
Once an application is being shared, the Collaborate button is activated and you can open the application to conference participants for collaborative use.
| |
1. |
Share an application (see To Share Applications). |
| |
2. |
Choose Tools Collaborate, or click Collaborate. |
| |
|
The shared application that was view-only by the conference participants is now open for collaboration. |
When you collaborate your shared application, other conference participants can take control. For a conference participant to take control of the shared application, they only need to click on that application on their desktop.
Note - When another conference participant clicks the shared application window and is then in control of it, that person effectively take over your mouse and keyboard. Only one user can be in control at a time. Any other user, including the host, can gain control by just clicking the mouse.
| |
To stop collaborating, click Collaborate again.
|
The shared application is returned to view-only for the conference participants.
| |
To Transfer Files
|
| |
1. |
Choose Tools Send File, or click Send File. |
| |
|
The Select a File to Send window is displayed. |
| |
2. |
Go to the directory and select the file you want to send. |
| |
|
The file is sent to all the participants in the conference. |
Files sent to you by other conference participants are received automatically. While the file is being received, another window shows the progress of the transfer. When the transfer is complete, the file is saved. The default directory for saving files is
/tmp. To change the default directory where files are saved, choose Options Tools Settings.
| |
To Chat
|
| |
1. |
Choose Tools Chat, or click the Chat button to start the chat application. |
| |
|
This also automatically starts the chat application on other user systems in the conference. |
| |
2. |
Select the recipient of your message. |
- To send to all participants, choose Send to Everyone in conference.
- To send to a single participant, choose Send to user name.
| |
|
The names of those conference participants who are running chat are listed in the Send to menu. |
| |
3. |
Type your message in the message field and press Return. |
| |
|
The message is displayed in your chat window and on the other participants' chat windows. |
You can list the date, time, and name with the message. To do this, click View on the Chat menu bar and select or deselect your choice.
You can save chat sessions to a file as a record of the conference. You are prompted to do so when you exit the Chat window.
Note - Though other conferencing products may have T.120 text chatting capability, they may not necessarily work with SunForum chat. Check the chatting status in the SunForum conference manager to see who is running chat.
| |
To Transfer Data Using the Shared Clipboard
|
| |
1. |
Ensure that Shared Clipboard is enabled on both systems. |
| |
2. |
Choose Tools Shared Clipboard. |
| |
|
The Shared Clipboard menu item should be active (checked). |
Note - To automatically enable Shared Clipboard, choose Tools Options.
| |
3. |
Select text from an application (for example, a Command Tool) on one system. |
| |
4. |
Choose Edit Copy. |
| |
5. |
In an application (for example, a text editor) on another system, choose
Edit Paste. |
The H.323 audio and video communications protocol is the standard for audio/video conferencing. SunForum conforms to the H.323 standard.
This section contains the following topics:
- Types of Audio/Video Conferences
- Configuring Audio and Video Capabilities
- To Set Audio/Video Options
- To Set Audio/Video Device Options
- Controlling Audio Within the Conference
- Controlling Your Video Image Over a Conference
- Controlling Video Image Within a Multipoint Conference
- Controlling Video Within a Point-To-Point Conference
Types of Audio/Video Conferences
Conferencing products may provide one of three different levels of audio/video support.
- Multipoint - You can see and hear many people in the call at the same time. Each person's video image appears in a separate window, and the audio information from each person is mixed together so that you hear a single audio channel including everyone's voice.
- Point-to-point - You can see and hear one other person in the call at a time, and can switch from one to another.
- No audio/video - You cannot see or hear other people in the conference. Users of conferencing products that do not support audio/video often set up a telephone-based conference call in parallel with the SunForum conference.
SunForum provides multipoint support, but can also operate in point-to-point mode or without audio/video to support conferences with other products:
- If everyone in the conference is using a product that supports multipoint audio/video, you can use either multipoint or point-to-point. (You may prefer to use point-to-point if people are familiar with products that operate only in this mode.)
- If some people are using a product that supports only point-to-point audio/video, you should use point-to-point. SunForum can be configured to force a conference to use point-to-point thus insuring that the products that only support point-to-point can establish audio/video links.
- Anyone who is using a product that does not support audio/video can still participate in the conference, but will not be able to see or hear other people. You can still use audio/video to communicate with anyone in the conference who has support for it.
When you start a call to another person, SunForum initially creates a point-to-point link for audio/video support regardless of the capabilities of the other product. Should a third person join the conference, their capabilities will determine if the conference becomes a multipoint conference or remains a point-to-point conference. Once a conference has become a multipoint conference, products that do not support multipoint will not be able to establish an audio/video link in the conference.
If you want to start a conference explicitly in point-to-point mode, you can specify this in the Audio/Video Settings dialog box. See To Set Audio/Video Device Options for more information.
In the current call window, the audio/video icons indicate an audio/video link to a participant in the conference.

FIGURE 2-3 Conference Manager Audio and Video Icons
Configuring Audio and Video Capabilities
| |
To Set Audio/Video Options
|
| |
Choose Options Audio/Video Settings.
|
| |
|
Or, choose View Audio/Video Settings in your video display window or the video display windows of others if you are in a conference.
TABLE 2-5 Audio and Video Options
Menu Item
|
Description
|
|
Use point-to-point Audio/Video connections
|
This option allows you to only use point-to-point connections for your audio/video conferences. This guarantees that users who only support point-to-point will be able to utilize Audio and Video as part of the conference.
|
|
Send image size
|
Specify the size of your video image as it appears to other people. This also determines the size of the My Video window on your screen. The range of window sizes that you can use depends on the capabilities of the conferencing products being used by other people. If you are already in a conference, one or more of these options may be grayed if other people are using conferencing products that cannot support them. You may find that the window size changes when you start a call, or when another person joins or leaves the conference. This is because another person may not be able to use the size that you originally selected; SunForum cooperates with the other conferencing products to select the best compromise between the requirements of everyone currently in the conference.
|
|
Default video magnification
|
This option specifies the default magnification (100% - 400%) used to display video on your system.
|
|
I prefer to receive...
|
This option allows you to tune the picture quality of the video images of other people as they appear on your screen.
- Move the slider towards Faster Video to view the video with more updates per second. This gives a smoother display, but reduces the resolution of the image.
- Move the slider towards Better Quality to view the video with higher resolution. This gives a better-quality video image, but may mean that the video appears less smooth.
|
|
Connection speed
|
Select the option that best describes the network over which you are using SunForum 3.1.
|
|
Echo suppression
|
If selected, SunForum 3.1 disables your microphone when it is playing back audio.
|
|
Auto Gain Control
|
If selected, SunForum 3.1 will automatically adjust the sensitivity of your microphone based on the input level.
|
|
| |
To Set Audio/Video Device Options
|
| |
Choose Options Audio/Video Device Settings.
TABLE 2-6 Audio and Video Device Options
Menu Item
|
Description
|
|
Audio Device
|
Allows you to choose the audio device to use for conferencing and the attributes associated with that device. First you select the audio device you want to use from the menu and then you push the "Settings" button to configure the device specific attributes. Each device is a unique attribute that can be configured.
|
|
Video Device
|
Allows you to choose the video device to use for conferencing and the attributes associated with that device. One choice is "None" for systems without video capture capabilities or for those who are capable but choose to disable it. First you select the video device you want to use from the menu and then you push the "Settings" button to configure the device specific attributes. Each device is a unique attribute that can be configured.
|
|
Using the Sun 1394 Camera Snap Feature
You can snap a video image directly from the camera with the Sun 1394 Camera. This allows you to capture an image at any location within a 3.0 meter range (1394 cable length) away from your workstation. This feature is activated through SunForum (see "Capturing and Copying Video Images" ).
Controlling Audio Within the Conference
You can adjust your own audio and adjust the audio you receive from the conference participants.
To Adjust Your Audio Over a Conference
The checkbox to the left of the Conference Manager Microphone icon indicates whether your audio is being played to other people in the call.
- To start or stop playing your audio to other people in the call, click on the checkbox to the left of the icon.
- To control the output level of your audio, move the slider to the right to make your audio louder, or to the left to make it quieter. This is important in a multipoint conference, where this slider determines the volume of your audio relative to other people's audio.
- If you are using point-to-point audio/video, only the person that you are currently switched to will be able to hear you. To switch to a different person in the call, see Controlling Video Within a Point-To-Point Conference.
To Adjust Conference Audio on Your Computer
The checkbox to the left of the Speaker icon indicates whether other participant's audio is being played on your computer.
- To start or stop listening to other people in the call, click on the checkbox to the left of the icon.
- To control the volume, move the slider to the right to increase the volume, or to the left to decrease it.
- If you are using point-to-point audio/video, you will hear only the person that you are currently switched to. To switch to a different person in the call, see Controlling Video Within a Point-To-Point Conference.
Controlling Your Video Image Over a Conference
Before starting a call using video, you can check the video image of yourself that will appear on other participant's screens (for example to make sure that the camera on your system is aligned correctly). The video image appears on your screen in a window with the title My Video. You can show or hide the My Video window at any time.
| |
To Control Your Video Image Before a Conference
|
| |
Choose Tools Video Display My Video.
|
| |
|
You can also hide the window by closing it. Prior to entering a call you will see the message Not Sending beneath the My Video window. |
Note - SunForum 3.1 software enables you to zoom your video display window.
To Control Your Video Image During a Conference
Once in a call, a button is displayed in addition to the status message at the bottom of the My Video window. The status message reflects the current state of video transmission. The button is used to change that state as follows:
- If the video status is "Sending", the Pause button is shown. Click on this button to pause the video display. When you pause the display, a "freeze frame" image appears in the window and the status message becomes "Paused."
- If video status is "Paused", the Play button is shown. Click on this button to activate the video display. When you activate the display, video transmission is restarted and the status message becomes "Sending".
Instead of the Pause/Play buttons in the window, you can use the Pause or Play option that appears in the View menu of this window. These options only appear when in a call.
You can control whether your video image is automatically sent to other people as soon as you start a call; see To Set Audio/Video Device Options for more information.
Controlling Video Image Within a Multipoint Conference
If you are using multipoint audio/video, a video image of each person in the call is displayed automatically when he or she starts sending video.
- Each participant's image is displayed in a separate window, with the participant's name as the window title. As other people join or leave the call, new windows appear or existing windows disappear.
- You can choose which of these windows are displayed on your screen.
| |
To Control Video Image Within a Multipoint Conference
|
| |
Choose Tools Video Display Others.
|
| |
|
Click on an entry for the window you want to display or hide. Alternatively, you can hide a displayed window by closing the window using the system menu. |
At the bottom of each of these windows, a button indicates whether the video is being displayed, as follows:
- If the video status is "Receiving", the Pause button is shown. Click on this button to pause the video display. When you pause the display, a "freeze frame" image appears in the window and the status message becomes "Paused".
- If video status is "Paused", the Play button is shown. Click on this button to activate the video display. When you activate the display, video transmission is restarted and the status message becomes "Receiving".
You can control whether you automatically display video images of other people as soon as they start sending video; see To Set Audio/Video Options for more information. If you do not display these images, the window for a remote user on your screen remains blank until you use the Play button to start the video display.
Instead of the Pause/Play buttons in the window, you can use the Pause or Play option that appears in the View menu of this window.
Note - The window size used for other people's video is determined by the sender's conferencing product.
Controlling Video Within a Point-To-Point Conference
In point-to-point audio/video, you can see and hear only one other person in the conference at a time. You can switch between different people in the conference; if you switch to a different person, the person you were previously seeing and hearing remains in the conference but is not switched to anyone.
Note - The switch attempt will fail if you try to switch to a person who is already switched to someone else.
| |
To Switch to Another Person
|
| |
Choose from the Tools Switch Audio and Video.
|
This displays a list of people that you can switch to, including the person you are currently switched to (with a selection marker next to that person's name). The list does not include people who do not have audio/video support.
- To switch to a different person, click on that person's name in the list.
- To "switch out" so that you remain in the conference but are no longer switched to anyone, click on the name of the person you are currently switched to (the name with the selection marker next to it).
The Switch Audio and Video menu item only appears if you are in a conference with more than one audio/video capable person and are using point-to-point connections.
Displaying Remote Video in a Point-To-Point Conference
If you are using point-to-point audio/video, the Remote Video window displays a video image of the person you are currently switched to (if any).
- To switch to a different person in the call, see Controlling Video Within a Point-To-Point Conference.
- You can choose whether to display this window on your screen by displaying Remote Video.
| |
To Display Remote Video
|
| |
Choose Tools Video Display Others' Video.
|
| |
|
This displays or stops displaying the window. Alternatively, you can close the window by clicking on the Close button for the window. |
The SunForum Whiteboard enables all conference participants to exchange ideas and graphics. You do not need to be in a conference, however, to use the whiteboard.
There are two types of whiteboards available through SunForum:
- T.126 mode, which allows you to interoperate with any computer system or appliance using the T.126 protocol, regardless of platform software
- SunForum 1.0 mode, which allows you to interoperate with certain collaboration software running on PCs.
This section contains the following topics:
- To Select a Whiteboard Mode
- To Draw Graphical Objects
- To Use Text Objects
- To Move and Delete Objects
- To Highlight Text and Images
- To Capture (Snap) Video Images
- To Add Screen Captures to the Whiteboard
- To Import Graphics
- To Export Graphics
- To Use the Remote Pointer
- To Use Whiteboard Stamps
- To Copy to the Clipboard
- To Navigate and Organize Pages
- To Add a New Page
- To Zoom the Whiteboard
- To Lock the Whiteboard
- To Save the Whiteboard Contents to a File
- To Print the Whiteboard Contents
| |
To Select a Whiteboard Mode
|
| |
1. |
Choose Options Tool Settings. |
| |
2. |
Choose the desired whiteboard mode: T.126 or SunForum 1.0 mode. |
Note - Once you select a whiteboard in the Options window, this whiteboard will open each time you select Whiteboard from either the Tools menu or from the Whiteboard button on the SunForum conference manager. See To Start the Whiteboard.
| |
To Start the Whiteboard
|
| |
Choose Tools Whiteboard, or click the Whiteboard button, from the SunForum
conference manager.
|
| |
|
The whiteboard mode you selected in the Options window is displayed. This example shows the SunForum T.126 mode whiteboard. |
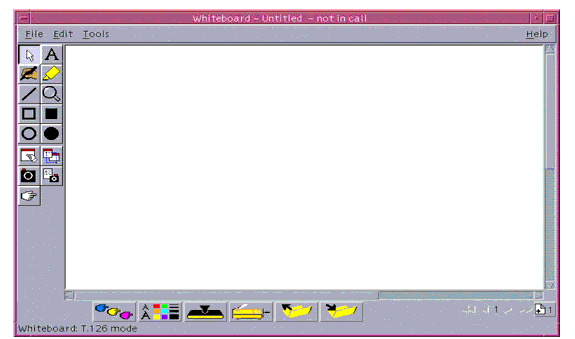
FIGURE 2-4 SunForum 3.1 Whiteboard
Whiteboard Menus
TABLE 2-7 Whiteboard Menu Bar Descriptions
Menu
|
Description
|
|
File
|
For file handling functions such as New, Open, Save, Import, Export, and Print.
|
|
Edit
|
To edit functions such as copy, paste, clearing, deleting, inserting pages, and so on.
|
|
Tools
|
To select drawing functions. You can also click the icon on the draw tool panel on the left side of the whiteboard.
|
Whiteboard Tool Panel
Familiarize yourself with the whiteboard by experimenting with the drawing features in the drawing tool panel to the left of the whiteboard. You do not need to be in a conference to do this.
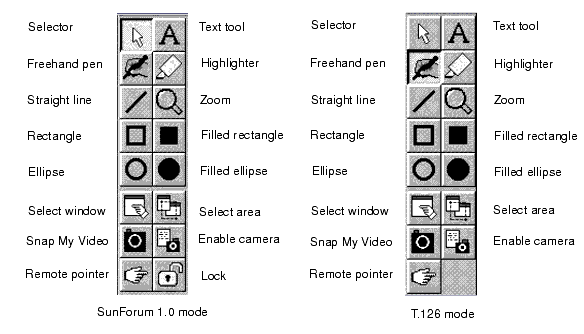
FIGURE 2-5 Whiteboard Tool Panel
| |
To Draw Graphical Objects
|
| |
1. |
Click the tool type in the whiteboard tool panel. |
| |
|
For example, click freehand pen or choose Tools Pen from the menu bar. |
| |
2. |
Choose your pen color and line thickness. |
| |
a. |
Click the Whiteboard Options button located on the bottom of the whiteboard.
|

FIGURE 2-6 Whiteboard Options Button
- The Whiteboard Options panel is displayed.
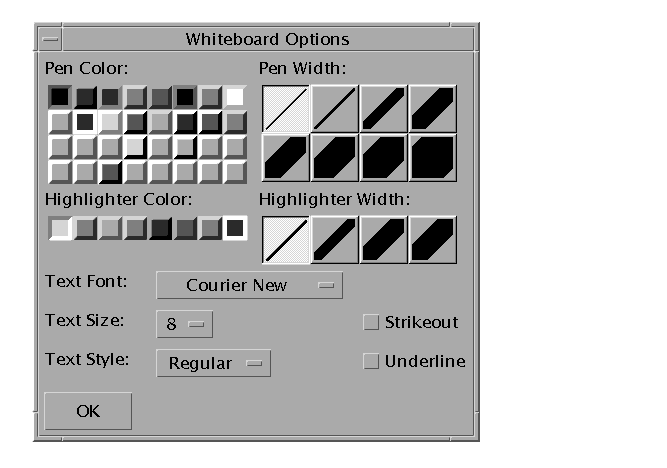
FIGURE 2-7 Whiteboard Options Panel
| |
b. |
Choose your pen color and pen width, then click OK.
|
| |
3. |
Click and drag your mouse button to draw the object. |
| |
|
As you release the mouse button, the object is seen by all other conference participants. |
To Use Text Objects
Creating Text Objects
| |
1. |
Click the Text tool button, or choose Tools Text. |
| |
2. |
Place your mouse pointer in the whiteboard where you want to enter text. |
| |
3. |
Click at that location. |
| |
|
A text field appears in the whiteboard. |
| |
4. |
Enter the text and click OK. |
Editing Text Objects
| |
1. |
Click the Text tool button, or choose Tool Text. |
| |
2. |
Click the text in your whiteboard that you want to edit. |
| |
|
A text field appears in the whiteboard. |
| |
3. |
Edit the text and click OK. |
Setting the Font and Style of Text Objects
You can set font options in two ways:
- By changing settings in the Whiteboard Options tool before creating a new text object
- By selecting a text object, then changing the settings in the Whiteboard Options tool.
- By selecting a text object, then changing the settings when the text field is visible.
| |
1. |
Click the Whiteboard Option button. |
| |
|
The Whiteboard Options window is displayed. |
| |
2. |
Click the Text Font, Text Size, and Text Style menus and choose the font setting. |
Note - Only a small number of fonts are available to ensure that text objects are able to display on all user systems in the conference.
| |
3. |
Click OK on the Whiteboard Options window. |
| |
To Move and Delete Objects
|
| |
1. |
Click the Selector tool button, or choose Tools Selector. |
| |
2. |
Click the graphic or text that you want to move or delete. |
| |
|
A border is highlighted on the selected object. |
| |
a. |
To move the graphic or text, drag it with the mouse pointer to its new position.
|
| |
b. |
To delete the graphic or text, press Delete on your keyboard, or choose
Edit Delete.
|
Note - If you delete an object by mistake, you can undelete and retrieve the last deletion by choosing Edit Undelete.
| |
To Highlight Text and Images
|
| |
1. |
Click the Highlight button, or choose Tools Highlighter. |
| |
2. |
Draw on the whiteboard area you want to highlight. |
Capturing and Copying Video Images
You may snap a camera video image from either the whiteboard tools panel, or from the Sun 1394 Camera snap button, and copy it as an image to the whiteboard.
| |
To Capture an Image from the Whiteboard Tools Panel
|
| |
1. |
Select the camera video image you wish to capture. |
| |
2. |
Click the Snap My Video from the Whiteboard tools panel or choose Tools Snap My Video from the Tools menu. |
| |
|
The image appears and is copied in the top left corner of the Whiteboard window. |
| |
To Capture an Image Using the Sun 1394 Camera
|
| |
1. |
Click the Enable Camera button on the whiteboard tools panel |
| |
|
This enables the Sun 1394 Camera snap button so that each time you press the camera snap button, the image is captured on the Whiteboard. |
| |
2. |
Focus on the image to be captured and press the Sun 1394 Camera snap button. |
| |
|
If you do not use the camera snap button for a period of 60 seconds, then the snap button becomes disabled again. |
Note - If you want to disable the snap button on the camera before the timeout period expires, simply press the Escape key.
To Add Screen Captures to the Whiteboard
You can capture the contents of a window, or an area of the desktop, to add to your whiteboard for conferencing.
Selecting and Capturing a Window
| |
1. |
Click the Select window button, or choose Tools Select Window. |
| |
|
The whiteboard becomes an icon and the mouse pointer becomes a hand symbol. |
| |
2. |
Place the mouse pointer on the window you want to add to your whiteboard. |
| |
|
The window is captured and placed in your whiteboard. |
Selecting and Capturing an Area of the Screen
| |
1. |
Click the Select window button, or choose Tools Select Area. |
| |
|
The whiteboard becomes an icon and the mouse pointer becomes a pair of crosshairs. |
| |
2. |
Drag the mouse pointer over the area of your desktop screen that you want to capture. |
| |
|
The image area is captured and placed in your whiteboard as you release the mouse button. |
Note - Once the image is captured in the whiteboard, you can use the Selector tool to select the image and move or delete it across your whiteboard. See To Move and Delete Objects.
| |
To Import Graphics
|
| |
1. |
Choose File Import. |
| |
|
The Select a file to import window is displayed. |
| |
2. |
Specify the file you want to import and click OK. |
| |
|
The image is added to the current page. |
Note - You need the shareware filter ghostscript to import PostScript files into the whiteboard. The location of ghostscript is specified in
/etc/opt/SUNWdat/config/system-config as Whiteboard.GSPath.
| |
To Export Graphics
|
| |
1. |
Choose File Export. |
| |
|
The Export file window is displayed. |
| |
2. |
Specify the file you want to export. |
| |
3. |
Choose an image format from the Save file as type menu. |
| |
|
The contents of the current page is written to the file in the selected format. |
| |
To Use the Remote Pointer
|
The remote pointer is a pointing hand that everyone in the conference can see. When you have the Select tool enabled, you can click on the pointer and drag it around, so that you can point out areas of interest on the page.
| |
1. |
Click the Remote Pointer button, or choose Tools Remote Pointer. |
| |
|
A hand symbol pointer is displayed on your whiteboard. |
| |
2. |
Click and drag the remote pointer to move to selected areas of interest. |
| |
To Use Whiteboard Stamps
|
The Whiteboard Stamps window offers a number of images you can "stamp" on the whiteboard. These are user configurable. The SunForum software enables you to use bitmap files (such as GIF) in user-defined locations.
Note - The location is /etc/opt/SUNWdat/config/dcgx, listed as Whiteboard.StampFilename.1 through Whiteboard.StampFilename.12. You may have more than 12 stamps, however.
| |
1. |
Click the rubber stamp button. |

FIGURE 2-8 Rubber Stamps Button
| |
|
The Whiteboard Stamps window is displayed. |
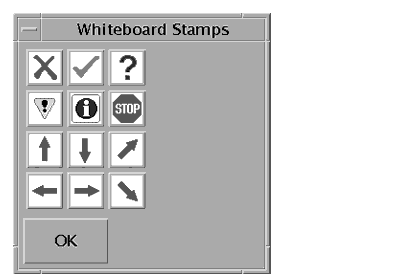
FIGURE 2-9 Whiteboard Stamps Window
| |
2. |
Click on a stamp image and click OK. |
| |
|
When you place the pointer in the whiteboard, the pointer is a stamp. |
| |
3. |
Place the stamp pointer in the whiteboard where you want the image to appear and click. |
| |
|
The stamp image is displayed. |
To Copy to the Clipboard
You can cut and paste to and from a clipboard in two ways:
- Using the quick method to copy text
- Using the Edit commands to cut and paste text and graphics
Using the Quick Method to Copy Text
| |
1. |
Select text in the whiteboard (or another text source window) or from another application. |
| |
2. |
Place the mouse pointer in the whiteboard and click the middle mouse button to paste the text selection. |
Using the Edit Commands
| |
1. |
Select the text or object you want to copy. |
| |
2. |
Choose Edit Cut or Edit Copy. |
| |
3. |
Go to a new whiteboard page and choose Edit Paste. |
| |
To Navigate and Organize Pages
|
| |
To navigate pages, use the navigation arrows at the bottom of the whiteboard to
change pages; or, use the Edit menu to clear, delete, insert, and to go to specific
pages.
|
| |
To organize pages, choose Edit Bring to Front or Edit Send to Back to move
the current page accordingly.
|
| |
To Add a New Page
|
| |
Click the new page button or choose Edit Insert Page, located in the bottom
right corner of the whiteboard.
|
| |
|
A new page is added after the current page. |

FIGURE 2-10 New Page Button
Note - Using the menu to insert a page enables you to place the new page before or after the current page.
| |
To Zoom the Whiteboard
|
| |
Click the Zoom button, or choose Tools Zoom.
|
| |
|
This changes the magnification of the whiteboard contents you are viewing. |
| |
To Lock the Whiteboard
|
You can lock the whiteboard so that no one else in the conference can make any changes to the contents.
| |
1. |
Click the Lock button, or choose Tools Lock. |
| |
|
After a short delay, either you will have successfully locked the whiteboard (indicated by the lock "down" position), or you will be notified that it could not be locked. You may not be able to lock it because another user in the conference has already locked the whiteboard or is in the middle of an operation that cannot be interrupted. |
| |
2. |
Click the lock button a second time to release the lock. |
Note - Locking feature cannot be used in a T.120 whiteboard.
| |
To Save the Whiteboard Contents to a File
|
| |
Choose File Open.
|
| |
Choose File Save (or File Save As).
|
| |
To Print the Whiteboard Contents
|
| |
Click the Print button, or choose File Print.
|

FIGURE 2-11 Print Button
| |
|
In the print window, specify the printer or file name to print to, and which pages you want to print. |
Note - The printer name must be a valid printer device. The SunForum software allows you to also specify a networked printer name.
Copyright © 2000 Sun Microsystems, Inc. All Rights Reserved.