


Changing the Display Settings
You can customize many parts of the Calendar display:
Determine the initial calendar that displays
Set time boundaries
Set the default view
 To Set the Initial Calendar Displayed
You can set Calendar to display a calendar other than your own when you first start it.
Choose Options from the File menu
The Calendar Options dialog box is displayed.
Choose Display Settings from the Category menu.
Double-click in the Initial Calendar View field and type calendar-name@hostname for the calendar you want to view each time you start Calendar.
Click Apply.
Click Cancel to close the Options dialog box.
To Set the Time Boundaries on Day and Week Views
Time boundaries are the earliest and latest hours you want displayed in your calendar.
Choose Options from the File menu.
Choose Display Settings from the Category menu.
Move the Begin and End sliders to adjust the earliest and latest hours you want displayed on your calendar.
Select 12 Hour or 24 Hour time display.
Click Apply.
Click Cancel to close the Options dialog box.
To Set the Default Calendar View
Calendar displays the default Calendar view each time you start it. The initial default view is by month. You may want to set the default to the view you use most often, such as Week view.
Choose Options from the File menu.
Choose Display Settings from the Category menu.
Select Day, Week, Month, or Year from the Default View options.
Click Apply.
Click Cancel to close the Options dialog box.
Changing Access and Permissions
You can set access to your calendar, controlling what others can do in your calendar. To determine whether you have access to other calendars, see "To Determine Whether You Have Access to Other Calendars".
To Grant Access to Your Calendar
Choose Options from the File menu.
Choose Access List and Permissions from the Category menu.
The Access List and Permissions dialog box is displayed.
Note - Depending on the version of your calendar, your Access List and Permissions dialog box may look different than the one pictured in Figure 13-1. If so, go to Figure 13-2 and follow the instructions after that figure.
Figure 13-1 Access List and Permissions dialog box - Version 1
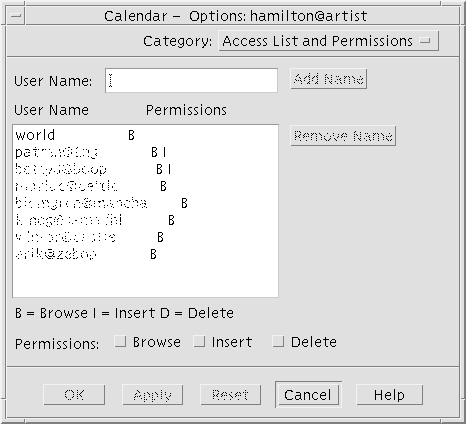
In the User Name field, type username@hostname for the user to whom you want to grant access. To grant access to everyone, type world in the User Name field.
The default permission is for browse access only.
Select Browse, Insert, and/or Delete permissions.
Browse
The default - enables others to see information in your calendar
Insert
Others can add appointments or To Do items to your calendar
Delete
Others can delete appointments or To Do items from your calendar
Click Add Name to add username or world to the Access list with the permissions you've chosen.
Note - Individual user access overrides world access; if everyone (world) has browse access only and user X has browse and insert access, user X can browse and insert entries in the current calendar.
To grant the selected access and close the dialog box, click OK.
To grant the selected access and leave the dialog box displayed, click Apply.
To erase your changes and leave the dialog box displayed, click Reset.
To erase your changes and close the dialog box, click Cancel.
Note - If your Access List and Permissions dialog box resembles Figure 13-2 below, follow the instructions after the figure.
Figure 13-2 Access List and Permissions dialog box - Version 2
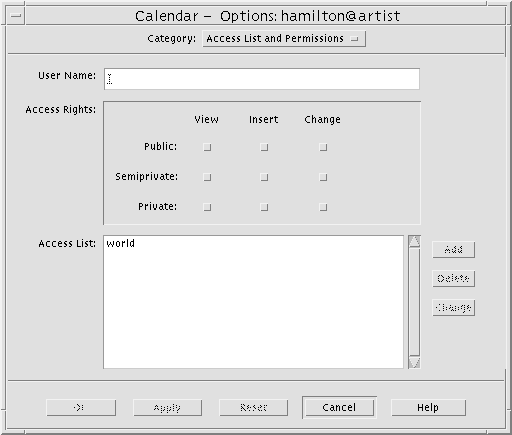
In the User Name field, type username@hostname for the user to whom you want to grant access. To grant access to everyone, type world in the User Name field.
The default permission is for view access to public appointments only.
Select View, Insert, or Change permissions and Public, Semiprivate, or Private access rights.
Permissions control whether others can perform specific operations on your calendar. You can choose more than one permission.
Access rights control the specific types of appointments others can perform operations on.`
Public
Enables another user to display the time and text of your appointments marked Others See Time and Text
Semiprivate
Enables another user to display the time and text of your appointments marked Others See Time Only
Private
Enables another user to display the time and text of your appointments marked Others See Nothing
Click Add to add username or world to the Access list with the permissions and access rights you've chosen.
Note - Individual user access overrides world access; if everyone (world) has browse access only, and user X has browse and insert access, user X can browse and insert entries in the current calendar.
To grant the selected access and permissions and close the dialog box, click OK.
To grant the selected access and permissions and leave the dialog box displayed, click Apply..
To erase your changes and leave the dialog box displayed, click Reset.
To erase your changes and close the dialog box, click Cancel.