


UNIX Key Bindings
UNIX® key bindings enable you to use a set of extended Emacs keys, such as Alt+B (back word) or Control+N (next line), in Text Editor. To enable UNIX key bindings (which are set off by default) you edit a file in your home directory.
 To Enable UNIX Key Bindings
Add the following line to the .Xdefaults file in your home directory:
#include "/usr/dt/app-defaults/language/UNIXbindings"
Replace language with the name of your language environment.
If the .Xdefaults file does not exist, create the file in your home directory.
Log out of your current session.
Log in and restart Text Editor.
Some Text Editor menu accelerators conflict with UNIX key bindings. When UNIX key bindings are enabled, Text Editor provides alternate menu accelerators for these commands:
Command
Alternate Menu Accelerator
Find/Change (Control+F)
Control+S
Paste (Control+V)
Shift+Insert
Print (Control+P)
No alternate accelerator
Undo (Control+Z)
Control+_
If you want to modify these menu accelerators, copy the contents of the /usr/dt/app-defaults/language/UNIXbindings file into your .Xdefaults file and then make your changes.
Note - When using UNIX key bindings, the Delete key deletes the previous character rather than the character that follows the cursor.
To Set Overstrike Mode
As you type, new characters are inserted. If you want to type over existing characters, change to Overstrike mode.
Choose Overstrike from the Options menu. To return to Insert mode, choose Overstrike again from the menu.
Or, use the Insert key to switch between Insert and Overstrike mode.
When Overstrike mode is on, the cursor changes to a solid block. If you use Overstrike mode often, you may want to display the status line (see "To Display the Status Line") because it indicates whether Overstrike mode is on or off.
To Type Over Text
Select the text.
Type the replacement text.
You can also choose Overstrike from the Options menu to turn off Insert mode and type over the text directly.
To Delete Text
Select the text.
Choose Delete from the Edit menu or press the Delete key.
Deleted text cannot be pasted, but it can be recovered with the Undo command (see "To Undo an Edit").
If you intend to paste the text that you delete, use the Cut command (see "To Undo an Edit").
To Clear Text
The Clear command replaces the selected text with spaces or blank lines.
To Undo an Edit
Undo reverses the last cut, paste, clear, delete, change, include, or format operation.
To Copy Text
Select the text to be copied.
Choose Copy from the Edit menu or press Control+C.
A copy of the text is stored on a clipboard where it can be accessed or replaced by other applications.
Click where you want to insert the text.
Choose Paste from the Edit menu or press Control+V.
You can also use drag and drop to copy text (see "To Copy Text Using Drag and Drop").
Note - Use this shortcut to copy a word or phrase: Select the text, move the pointer to where you want to insert the text, and click mouse button 2. This is a quick way to copy text into a dialog box.
To Move Text (Cut and Paste)
Select the text.
Choose Cut from the Edit menu or press Control+X.
The text is erased from the document and stored on a clipboard where it can be accessed or replaced by other applications.
Move the cursor to where you want to insert the text.
Choose Paste from the Edit menu or press Control+V.
You can also use drag and drop to move text (see "To Move Text Using Drag and Drop").
To Include a File
You can insert a text file into your document using a menu command or by dragging a file icon into the Text Editor window (see "To Include a File Using Drag and Drop").
Position the cursor where you want to insert the text file.
Choose Include from the File menu.
The Include a File dialog box lists files and folders on your system. You can browse the documents listed, or change to a new folder to locate other files on your system.
Figure 12-5 Include a File dialog box
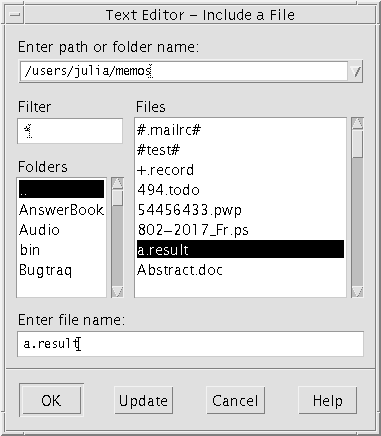
Select the document you want to insert in the Files list.
Press Return or click OK.
Note - To include a file from a CD-ROM or diskette that has been mounted, choose /cdrom/cd_name or /floppy/floppy_name through the menu button at the end of the text field, Enter path or folder name. Select the file name and click OK.