


Printing
You can easily print files, find or cancel print jobs, and get information about printers and print jobs through the desktop.
Your Default Printer
Your system may have more than one printer that you can use for printing. One of the printers will be designated as the default printer. The default printer is the printer that your desktop automatically uses if you submit a document for printing and you don't specify a printer name. When you first open your desktop, the default printer is shown in the Front Panel.
To find out how to display a printer other than your default printer in the Front Panel, see "To Change the Front Panel Printer".
 To Determine the Default Printer
To find out the name of your default printer, double-click the Default printer control in the Personal Printers subpanel in the Front Panel.
This starts the Printer Jobs application. The name under the printer icon is the name of your default printer.
To Change the Default Printer
To designate a different printer as the default printer:
Go to your home folder and open the file .dtprofile.
Add or edit a line that sets a value for the LPDEST environment variable:
LPDEST=printer_device; export LPDEST
If you are using csh the syntax is:
setenv LPDEST printer_device
Note - This change will take effect the next time you log out and back in again.
For example, the following line would change the default printer to the printer whose device name is laser3d.
LPDEST=laser3d; export LPDEST
If you are using csh the syntax is:
setenv LPDEST laser3d
Printing Files
The desktop can print different types of files, as listed in Table 11-1.
Table 11-1 Types of Data That Can Be Printed (Initial Configuration)
Type of Data | Data Type Requirement | Description |
|---|---|---|
Text file | File name ends with.txt | Text files containing ordinary (ASCII) text data |
PostScript | File name ends with .ps, or content is recognized as PostScript data | PostScript files (requires a PostScript printer) |
PCL | File name ends with.pcl,or content is recognized as PCL data | Printer Control Language files (requires a PCL printer) |
Data | Contains text data | The default data type assigned to all files containing ASCII data that do not match other data types |
If applications are installed on your system that create other types of files, your system administrator can add printing capabilities for them.
Note - Ensure that your destination printer is capable of printing PostScript™ or PCL files before you try to print them.
Submitting a File to a Printer
There are many ways to submit a file to a printer:
Using the Front Panel
Using File Manager
Using Print Manager
Using applications
To Print Using the Front Panel
Drag a single file or multiple files from File Manager to the Printer control in the Front Panel or to a Printer icon in the Personal Printers subpanel.
The system then displays a Print dialog box for specifying print options. A Print dialog box appears for each file you drag to the Printer control.
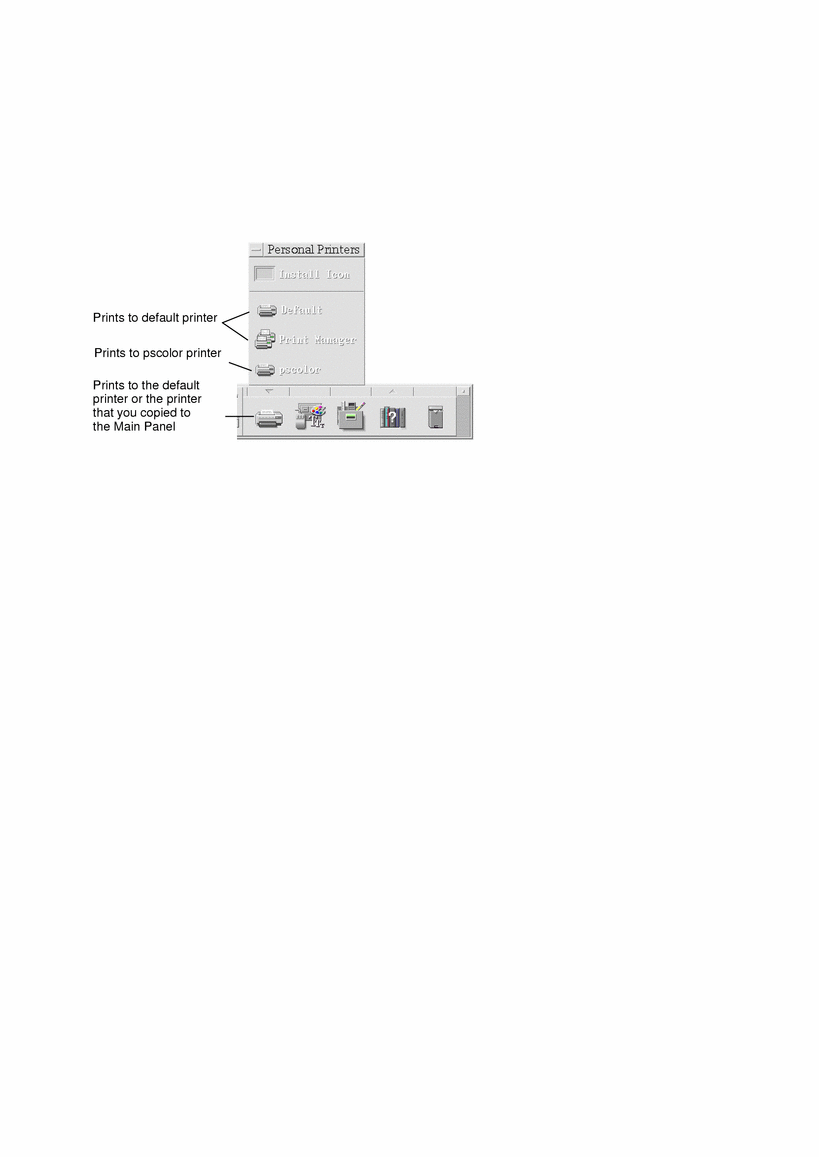
Note - pscolor will not show on your system. It is only included as an example of a printer that has been added to a system.
Optional. Use the text fields in the Print dialog box to set additional print options. (See "Setting Print Options Using the Print Dialog Box".)
Click OK in the Print dialog box to send the job to the printer.
To Print Using File Manager
Choose Print from the Selected menu or the file's pop-up menu.
The system displays a Print dialog box for specifying various print options.
Optional. Use the text fields in the Print dialog box to set additional print options. (See "Setting Print Options Using the Print Dialog Box".)
Click OK in the Print dialog box to send the job to the printer.
To Print Using Print Manager
Drag a file from File Manager to a printer icon in Print Manager.
In Print Manager, you can submit a document by dropping it on a printer icon or into the jobs list area to the right of a printer.
Note - If you submit a job to a printer that is down (flag is showing), it may never be printed even though it appears in the jobs list.
The system displays a Print dialog box for specifying various print options.
Optional. Use the text fields in the Print dialog box to set additional print options. (See "Setting Print Options Using the Print Dialog Box".)
Click OK in the Print dialog box to send the job to the printer.
Setting Print Options Using the Print Dialog Box
The desktop displays the Print dialog box when you print text, PCL, PostScript, and data files (see Table 11-1).
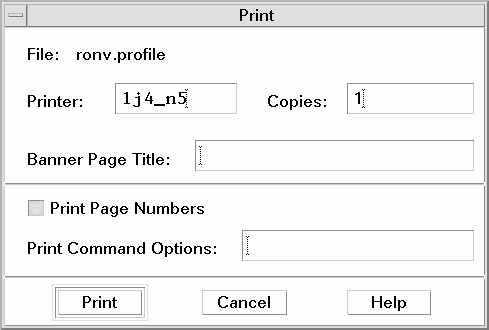
When application data files, such as word processor documents, are submitted for printing, they may display their own unique Print dialog boxes.
Use the Print dialog box to set these print options:
Table 11-2 Setting Print Options
Printer | The destination for the print job. The text field initially displays the printer on which you dropped the data file. In this example, the document was dropped on a printer named lj4_n5. |
Copies | The number of copies to print. The default is 1. |
Banner Page Title | A title to appear on the banner page. The banner page is a sheet of paper that the printer prints before it prints the first page of your document. |
Print Page Numbers | Prints page numbers on each page. If page numbering is selected, Print Manager will not display the true name of your document. Instead, the name in the jobs list will be STDIN:XXXXX, where XXXXX is a five-digit number. |
Print Command Options | Other options that change the way printing is done. See the next section for more details on using this field. |