 To Add Custom Fields to the Format Menu
Besides the To, Subject, Cc, and Bcc fields in the Format menu of a Compose window, you may want to add your own fields, such as Reply-To, Return-Receipt-To, and so on.
Choose Compose Window from the Options menu.
The Compose Window Options dialog box is displayed.
Type a name in the Header Name field as it will appear in the Compose window header (for example, Return-Receipt-To).
(Optional) Type a default entry for the defined header field in the Default Value field (for example, your email address).
Click Add to add the values to the scrolling list.
To change a custom field, select it and edit the Header Name or Default Value field, as appropriate, then click Change.
To remove a custom field, select it and click Delete.
Click OK or Apply to make your changes take effect.
 To Customize Mail Notification
To determine how Mailer signals the arrival of new mail:
Choose Notification from the Options menu.
Under "Signal new mail with," specify whether you want Mailer to beep, the Header window to flash, or Mailer to play an audio file when new mail arrives. You can choose to have all three signals if you desire.
Set the number of beeps and flashes by clicking on the up or down arrow under Beeps and Flashes.
To play an audio file, either type the full path name of the file in the Sound File text field, or click Select to specify that file in a File Selection dialog box.
Configuring the Appearance of the Toolbar
From the settings in the Toolbar Options dialog box, you can change the appearance of the Toolbar buttons (as icons or with text), determine which buttons display, and set the order in which they are displayed.
By default, the following commands appear as icons: Delete; Next; Previous; Reply, Include Message; Forward; New Message; Print One; Open Mailbox; and Reply.
 To Customize the Toolbar
Choose Toolbar from the Options menu.
The Toolbar Options dialog box is displayed. Under Commands is a list of the commands you can choose to be displayed in the Toolbar, either as icons or with text. Those commands you have chosen to be displayed in the Toolbar are shown in the Toolbar scrolling list.
Select Icons or Text as your preference for the display.
(Optional) Click Add or Remove to add or remove a selected command from the Toolbar.
(Optional) Click Move Up or Move down to change the order in which the buttons are displayed.
Click OK or Apply to make your changes take effect.
Using the File Selection Dialog Box
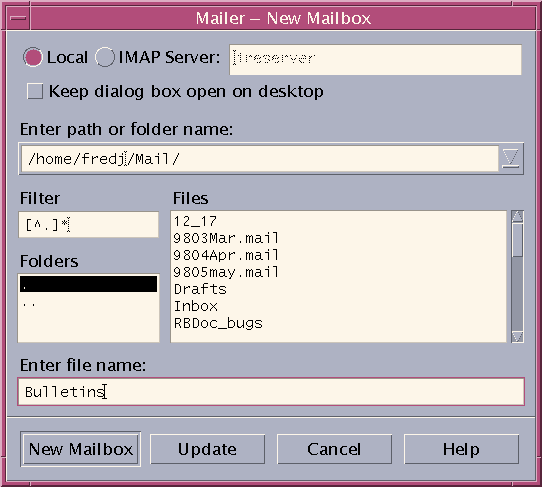
When you perform certain functions (like opening a mailbox or saving a message), there is a standard method to access your file system. From a File Selection dialog box, you are presented with a place to enter a path or folder name or a place to select from the folders and files in your file system.
Figure 10-9 File Selection dialog box

The title bar and the buttons of the dialog box vary, depending on the operation you wish to perform.
The fields are:
Local or IMAP Server - Specifies the mail server type. If you select IMAP Server, type its name in the text field.
Keep dialog box open on desktop - Indicates that you do not want the New Mailbox dialog box to disappear after you click New Mailbox (same affect as Apply button on most dialog boxes).
Enter path or folder name - Indicates the path to the item. It can be a location anywhere in your file system. If folders or file names are selected, the path appears here.
Filter - Shows the filter criteria; an asterisk (*) shows all files. You can enter wildcard characters to display only those files that match a suffix. For example, *.doc lists only those files with a .doc suffix.
Folders - Lists the folders in the current directory.
Files - Lists the files within the current folder.
Enter file name - Shows the name of the mailbox. You can either type in the name or select it from the list.
You can:
Click Open Mailbox (or whatever action is specified in the leftmost button) to perform the operation and dismiss the dialog box.
Click Update to display a new list of files after changing the filter key or changing to a new folder.
Click Cancel to halt the operation without applying the changes and dismiss the dialog box.
Click Help to display information about this dialog box.


