 To Replace a Control in the Main Panel
The easiest way to replace a control in the Main Panel is to exchange it with a subpanel control. If the control does not have a subpanel, you can create one temporarily or permanently.
If the control you want to replace does not have a subpanel, create one by choosing Add Subpanel from the control's pop-up menu.
Display the new subpanel.
If the control you want to put in the Main Panel is not already in the subpanel, add it to the subpanel.
Choose Copy to Main Panel from the subpanel control's pop-up menu.
 To Remove All User Customizations
Note - This procedure does not affect advanced customizations made by manually editing Front Panel configuration files.
Open Application Manager and double-click the Desktop_Controls application group icon.
Double-click Restore Front Panel.
The screen will go blank for several seconds while the Workspace Manager is restarted.
The Restore Front Panel action removes all customization made using:
The Install Icon control
The Front Panel's pop-up menus
Customizing Workspaces
You can use the Front Panel workspace switch to rename workspaces and change the number of workspaces.
 To Rename a Workspace
Point to the workspace button of the workspace you want to rename.
Choose Rename from the button's pop-up menu (displayed by pressing Shift+F10 or mouse button 3).
The workspace button turns into a text field.
Edit the text field.
Press Return.
 To Add Workspaces
Point to any area in the workspace switch and press mouse button 3 to display the pop-up menu.
Choose Add Workspace from the pop-up menu.
The new workspace, named New, is placed at the end of the set of workspaces.
Rename the workspace (see "To Rename a Workspace").
 To Remove Workspaces
If you remove a workspace that contains windows, those windows are moved to the next workspace.
Point to the workspace button of the workspace you want to remove.
Choose Delete from the button's pop-up menu (displayed by pressing Shift+F10 or mouse button 3).
 To Customize the Controls in the Workspace Switch
This is an advanced task that requires you to create a Front Panel configuration file. Advanced customization is covered in Solaris Common Desktop Environment: Advanced User's and System Administrator's Guide.
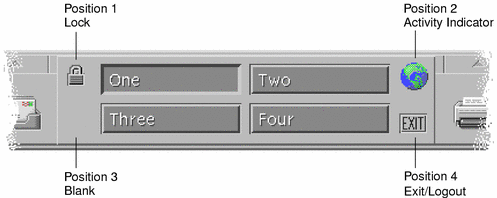
Initially, the workspace switch has the four positions shown below.

Use this procedure to replace one of these controls. (Blank is also a control.)
Install the application you want placed in the switch into the Applications subpanel.
For example, if you want to add a Display System Load control to the switch, drag it from the Desktop_Tools application group to the Applications subpanel.
Locate the Front Panel configuration file created automatically when you installed the control in the Applications subpanel. The definition is located in the directory $HOME/.dt/types/fp_dynamic.
For example, when Display System Load is added to the Applications subpanel, it creates the file Xload1.fp.
Move the file from the $HOME/.dt/types/fp_dynamic directory to the $HOME/.dt/types directory.
Open the file in the $HOME/.dt/types directory for editing.
Edit the lines that define the CONTAINER_TYPE and CONTAINER_NAME to the following:
CONTAINER_TYPE SWITCH
CONTAINER_NAME Switch
Edit the line that defines the position (POSITION_HINTS). For example, to put the control in the Blank location, set:
POSITION_HINTS 3
Save the configuration file.
Create another file in the $HOME/.dt/types directory.
The file name must end with .fp. For example. you might create a new file $HOME/.dt/types/DeleteBlank.fp.
Open the file for editing.
Open the file /usr/dt/appconfig/types/language/dtwm.fp in another editor window.
This file is read-only. You will not have to write to it.
In /usr/dt/appconfig/types/language/dtwm.fp, find the definition for the switch control you are replacing.
For example, this is the definition for the Blank control:
CONTROL Blank
 {
 	TYPE					blank
 	CONTAINER_NAME					Switch
 	CONTAINER_TYPE					SWITCH
 	POSITION_HINTS					3
 	ICON					FpblnkS
 	HELP_TOPIC					FPOnItemSwitch
 	HELP_VOLUME					FPanel
 }
Copy the definition for the control you are replacing from /usr/dt/appconfig/types/language/dtwm.fp to the new configuration file.
For example, you would copy the definition for the Blank control to the new file $HOME/.dt/types/DeleteBlank.fp.
Add the line DELETE True to the end of the definition, within the curly braces:
CONTROL Blank
 {
 	... 	HELP_VOLUME					FPanel
 	DELETE					True
 }
Save the file.
Choose Restart Workspace Manager from the Workspace menu.


