


Using Personal Digital Assistant (PDA) Synchronization
The Personal Digital Assistant Synchronization (PDA Sync) application enables you to synchronize data from Sun applications, such as Calendar Manager, with data in a similar application on your PDA. It also enables you to install applications and databases from your workstation or server to your PDA.
For example, applications that have been downloaded from the web can be copied to your PDA using PDA Sync. All illustrations in this document depict the software interacting with a PDA.
The applications correlate as Calendar manager/Date Book, Address manager/Address Book, Desktop Mail/Mail, and Text Note/Memo Pad. PDA Sync supports most Palm Pilot Computing platform handheld devices, including the Palm V, Palm III and PalmPilot Professional Edition.
Note - Please refer to "About PDA Sync" in the online help pulldown menu for important information on the differences between Sun's PDA Sync and 3COM's HotSync product.
Accessing PDA Sync Software
Access the PDA Sync software using the following procedure.
Using the desktop icon, open the Applications pull-down menu from the Front Panel (typically at the bottom of your screen), click on Applications to open Application Manager.
Double-click on Desktop_Apps to locate the PDA Sync icon.
Click on the PDA Sync icon.
You can also access the PDA software by entering /usr/dt/bin/sdtpdasync an the command line.
In order to make the PDA Sync icon more accessible in the future, drag and drop the PDA Sync icon from the Desktop_Apps screen into the Install area of the Application pull-down menu or into your user space.
For more information on the PDA Sync application, see the Help information on the PDA Sync software.
Configuring Synchronization
The application opens by default to the Synchronization tab.
Figure 22-1 Configuring Synchronization
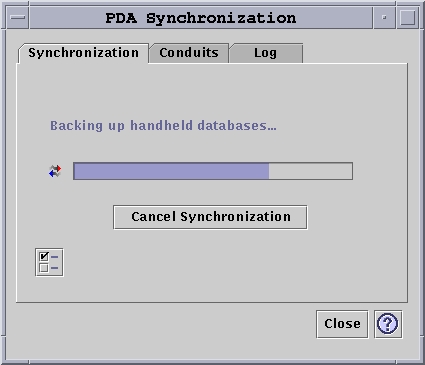
The application begins a synchronization operation using current or default configurations on the currently active or default conduits, as defined on the Conduits tab. The first thing you must do when the Synchronization window appears is establish the port setting in the Synchronization Properties window.
Setting Synchronization Properties
Clicking the properties button (the one with a checkmark on it) on the Synchronization tab brings up the Synchronization Properties dialog box (refer to the following figure). This dialog contains all of the PDA Sync options that are not directly related to specific conduits and therefore do not belong in the conduit configuration dialog boxes. The options in this dialog box are not likely to require changing very often.
Figure 22-2 Setting Synchronization Properties
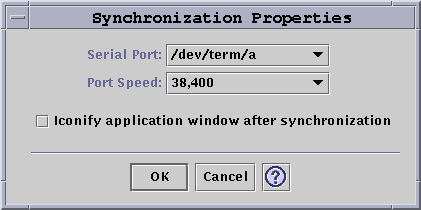
In this dialog you can:
Set the serial port. Select the port from the options list to which you connected the PDA.
Set the port speed. The default is "As fast as possible". The choices in this pull-down menu are the speeds that are supported by the API.
Set the "Iconify application window after synchronization" to ON (default) or OFF. The window will minimize itself to an icon automatically upon completion of the sync. If it is turned OFF, the window will remain open on the screen after the sync is completed.
Configuring Conduits
The Conduits tab contains a list of all the conduits that are available to the PDA Sync application. This is not a fixed list, as conduits can be added and removed. Active conduits are indicated with a check mark. A Synchronize operation runs all of the active (checkmarked) conduits ONLY, as shown in the following figure.
Figure 22-3 Configuring Conduits
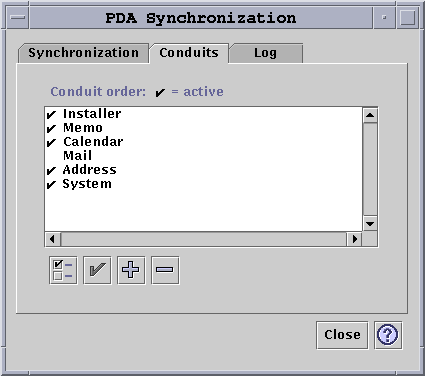
The buttons below the scrolling list represent actions you can take on the selected conduit in the list (except the Add Conduit button). When the pointer is over one of the buttons, the button name is displayed in a small Button Tag that appears near the button. The button names in the toolbar are:
"Change Conduit Settings" (a checked box) - brings up the configuration dialog for that particular conduit and is disabled if more than one item is selected.
"Toggle the Conduit's Activate State" (a check mark) - Either activates or deactivates the conduit. When a conduit is active, it is executed in the next synchronization.
"Add New Conduit to List" (a plus (+) symbol) - Brings up a file selection dialog enabling you to add new conduits. (See the Adding a Conduit section.)
"Delete Conduit from List"(a minus (-) symbol) - Removes the conduit from the list, after a confirmation dialog.
Calendar
The Configure Calendar Conduit window enables you to determine how appointments are synchronized between calendar applications. Refer to the following figure.
Figure 22-4 Configuring the Calendar Conduit
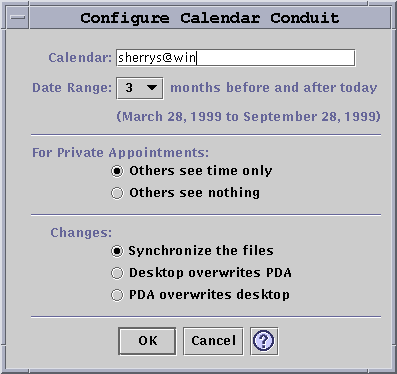
In this window you can:
Change the host name. The default is user@host.
Specify the base calendar on the workstation or server.
Determine a rolling date range to synchronize. The default range is six months.
Determine what information is displayed for others to see on private appointments marked on your PDA.
Change the data synchronization direction to:
Synchronize the files (this is the default) -- merges the calendar information on your desktop and your PDA.
Desktop overwrites PDA -- replaces your PDA calendar information with the calendar information you have on your workstation.
PDA overwrites desktop -- replaces your desktop calendar information with the calendar information you have on your PDA.