


Recording With Audio
You can record and save audio files in three formats.
 To Specify Record Options
You can specify audio format, sample rate, encoding method, channels, record volume, and input balance in the Options dialog box. You can also specify whether you will specify the values when you start recording, or if the set values will be used automatically when recording or if you will specify the values when you start recording.
Choose Record from the Options menu.
The Options dialog box is displayed, with Record selected as the Category. If the Options dialog box is already displayed, choose Record from the Category menu.
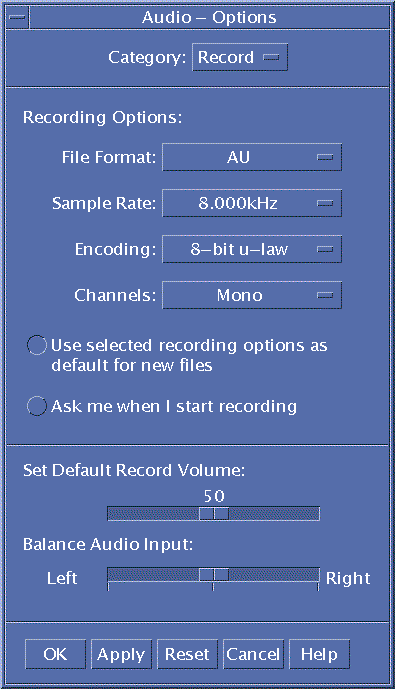
Choose AU, WAV, or AIFF from the Audio Format menu.
AU, which is the default, is Sun audio format. WAV is Microsoft PC format. AIFF is Macintosh audio format.
Choose samples per second from the Sample Rate menu.
8.000kHz is the default. Other rates fall in a range between 5.510kHz and 48.000kHz.
Choose an encoding method from the Encoding menu.
Encoding method options include u-law, A-law, and linear PCM.
Choose Mono or Stereo from the Channels menu.
Choose Mono, the default, for single-track recording, or Stereo for multiple channels.
Determine whether to use the selected recording options as the default for new files.
To use the selected recording options as the default, click Use selected recording options as default for new files.
To specify recording options when you click Record Audio, click Ask me when I start recording.
Set default record volume and balance the audio input.
Position the mouse pointer over the slider and press mouse button 1 as you move the mouse to set the Default Record Volume and Balance Audio Input sliders to desired positions.
Click OK to apply the specified values and close the Options dialog box.
To Create a Recording
You can record Audio files from a microphone, line-in, or CD source.
Specify recording options.
Choose New from the File menu or hold down the Control key and press ``n'' with the mouse cursor over the Audio main window.
If a previous recording has not been saved, you are asked if you want to save it.
Prepare to record.
Be sure that the selected input device is connected to your computer and ready for transmission, and that the microphone or other input device is on.
Click Record Audio button and start recording.
Speak, sing, or play into the microphone or start transmission of audio from a line-in or CD source. Recording starts as soon as you click Record Audio unless you have specified Ask me when I start recording in the Options-Record dialog box.
When recording is complete, click the Stop Recording button.
Click Play Audio button to play what you have just recorded.
Note - The Record Audio button, which becomes the Stop Recording button during recording, is inactive if a file is open; the button's function is not displayed in the current function area when it is inactive. Similarly, the Play and Go to buttons are inactive when no audio file has been opened or recorded.
To Save an Audio File or a Recording
You can save an existing audio file or a new recording in AU, AIFF, or WAV format.
Choose Save As from the File menu or hold down the Control key and press ``a'' with the mouse cursor over the Audio main window.
The Audio - Save As dialog box will be displayed.
Specify the folder in which you want to save the file.
Change to a different folder, if you wish. Press Return or click Update to update the folder location.
Choose a format (AU, WAV, or AIFF) from the Audio Format menu.
AU, which is the default, is Sun audio format. WAV is Microsoft PC format. AIFF is Macintosh audio format.
Type a name in the Enter file name field.
Audio files are usually named with .au, .wav, or .aiff suffixes for easy identification. To overwrite an existing file, select the file in the Files list.
Click OK to save the audio file or recording.
To Specify Input and Output Device Options
You can specify output (play) and input (record) devices for playing and recording. Audio automatically detects the type of device accessed. If Audio is started with a play-only device, only playback options and output sources are available. If Audio is started with a record-only device, such as a microphone, only record options and input sources are available.
Choose Devices from the Options menu.
The Options dialog box is displayed, with Devices selected as the Category. If the Options dialog box is already displayed, choose Devices from the Category menu.
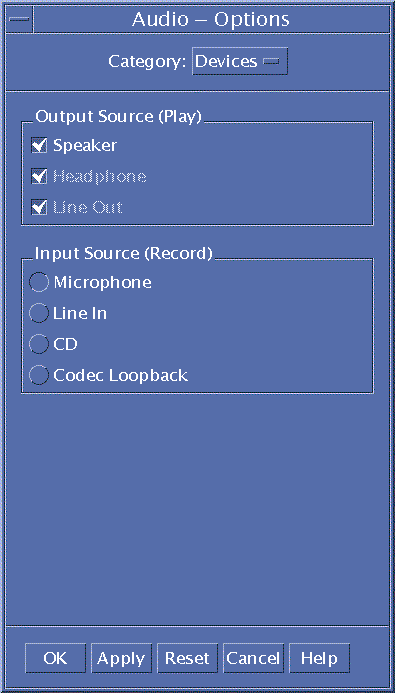
Select Speaker, Headphone, or Line Out as Output Sources.
Note that you can select more than one output source. Only devices that are installed on your computer are active.
Select Microphone, Line In, CD, or Codec Loopback as the Input Source.
Only devices that are installed on your computer are active.
Click OK to apply the specified values and close the Options dialog box.