


 To Print a Page from a Document
Display the required page in Image Viewer.
Choose Print Page from the File menu.
Image Viewer prints one copy of the current page on the current printer.
To Print an Image File
Display the required image in Image Viewer.
Choose Print Image from the File menu.
Image Viewer prints one copy of the current image file on the current printer.
Image Viewer File Formats
You may want to identify the specific format, or file type, of the file you want to open. Image Viewer can open files in the formats listed in Table 16-2, which you can specify by choosing Open As from the File menu.
Table 16-2 Image Viewer Open File Formats
Andrew Toolkit | Kodak Photo CD (Base/4) |
Atari Compressed Spectrum* | Lisp Machine Bit-Array |
Atari Degas 1* | MGR |
Atari Degas 3* | MTV/PRT Ray-Tracer |
Atari Uncompressed Spectrum* | MacPaint |
AutoCAD Slide | PBM |
Benet Yee Face File | PC PaintBrush |
CMU Window Manager | PGM |
Encapsulated PostScript (EPSF) | PICT |
FITS | PPM |
GEM | PostScript |
GIF | QRT Ray-Tracer |
Gould Scanner | Sun Icon |
Group 3 FAX | Sun Raster |
HIPS | TIFF |
HP PaintJet | TrueVision Targa |
IFF ILBM | Usenix FaceSaver |
Img-Whatnot | X Bitmap |
JFIF (JPEG) | X11 Window Dump (XWD) |
Kodak Photo CD (4Base) | XPM |
Kodak Photo CD (Base) | Xerox Doodle Brush |
Kodak Photo CD (Base/16) | Xim |
*SPARC only.
Image Viewer can save files in the formats listed below:
Encapsulated PostScript (EPSF) | GIF |
JFIF (JPEG) | PostScript |
Sun Raster | TIFF |
XPM |
|
Using Snapshot
Snapshot takes a "snapshot" of a window, of a region of the desktop, or of the entire desktop screen. You can then view, save, or edit the snapshot in Image Viewer.
To Start Image Viewer Snapshot
Or, start Image Viewer with the -snapshot option:
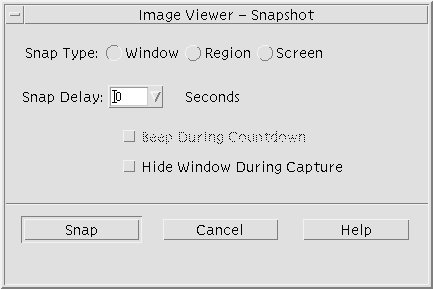
Figure 16-5 Snapshot window
To Take a Snapshot of a Window
If Snapshot is not running, choose Snapshot from the Image Viewer File menu.
Click the Snap button.
The mouse pointer becomes a plus sign.
Move the mouse pointer to the window to be snapped and click mouse button 1.
The message at the bottom of the Snapshot dialog box reads "Snap succeeded" once the window is snapped.
To Take a Snapshot of a Region
If Snapshot is not running, choose Snapshot from the Image Viewer File menu.
Click the Snap button.
The mouse pointer becomes a plus sign.
Move the mouse pointer to a corner of the region to be snapped, press and hold mouse button 1, drag the mouse diagonally to encompass the region to be snapped, and release mouse button 1.
The message at the bottom of the window reads "Snap succeeded" once the region is snapped.
To Take a Snapshot of the Screen
If Snapshot is not running, choose Snapshot from the Image Viewer File menu.
Click the Snap button.
The message at the bottom of the window reads "Snap succeeded" once the screen is snapped.
To Take a Delayed Snapshot
When taking a snapshot of a menu or some other pop-up or pull-down element, you can delay the time between clicking Snap and the snapshot being taken.
If Snapshot is not running, choose Snapshot from the Image Viewer File menu.
Determine the number of seconds to delay by using the down arrow button and selecting a value or by typing in the text field.
The next time you click Snap, the snapshot will be delayed by the specified number of seconds.
(Optional) If you want to hear the seconds counted off before the snapshot is taken, select Beep During Countdown.
Select a Snap Type and click Snap.
If Snap Type is Region, drag mouse button 1 to select the region to be snapped.
Make any necessary adjustments to the image during the snap delay time.
You can display a menu, for instance, by clicking on an item in a menu bar.
After the specified number of seconds, the window, region, or screen is snapped and "Snap succeeded" is displayed in the message area at the bottom of the window.