Moving from the OpenWindows Environment to Solaris CDE
This chapter helps you to use the CDE environment for the first time if you are already familiar with the OpenWindows environment. It takes you through the CDE login process, and then discusses aspects of the CDE environment.
Where helpful, the difference between OpenWindows behavior and CDE behavior is explained.
This book does not describe CDE in detail. For detailed procedures and descriptions consult Solaris Common Desktop Environment: User's Guide and the CDE online help volumes.
To Log In to CDE for the First Time
Display the login screen on your workstation.
Choose Session from the Options menu.
Select Common Desktop Environment (CDE).
The CDE logo is displayed on the login screen.
Type your username and click OK.
Use your standard UNIX username and password. If you previously used OpenWindows, try the username and password you used for that environment, otherwise contact your system administrator.
The login screen prompts you to enter your password.
Type your password and click OK.
CDE logs you in and displays the default workspace, the Front Panel, and a welcome message.
Note - For more information on logging in, see "Chapter 2, Starting a Desktop Session" in Solaris Common Desktop Environment: User's Guide.
Now read the following topics and explore the CDE desktop.
Desktop
Graphical environments such as the CDE and OpenWindows desktops use windows and other objects to represent applications, files, and services available to the user. When you log into CDE, the CDE desktop is displayed.
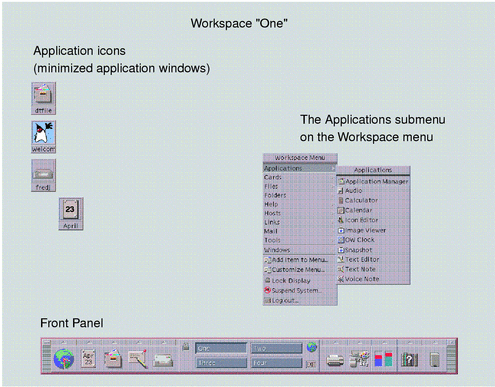
Figure 1-1 CDE Desktop

CDE Desktop
The CDE desktop comprises a Front Panel sitting over a selected workspace, or screen background. The Front Panel displays information about your workstation, and enables you to run applications, to log out, and to switch between workspaces. Applications that are running are represented by windows and icons on the workspace. As in OpenWindows, a Workspace menu is also available.
Front Panel
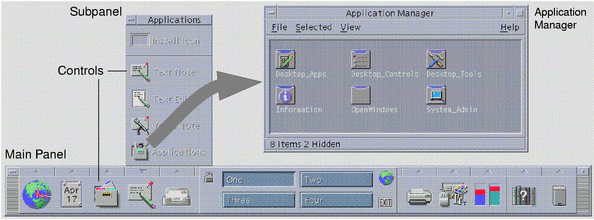
The Front Panel (see Figure 1-2) is a collection of frequently used controls and desktop services available in every workspace.
Some Front Panel controls have subpanels associated with them. The subpanels contain related groups of controls. Click the triangle above the Front Panel control to open its subpanel. Click an inverted triangle to close a subpanel.
Controls on the Front Panel enable you to access most applications; applications that do not have a control on the Front Panel can be accessed using Application Manager.
Figure 1-2 Front Panel and Application Manager

Tip - You can minimize the Front Panel to release space on the desktop.
Workspaces
Workspaces are like separate screens or desktops. You can only display one workspace at a time, but applications in all workspaces can run simultaneously. To display another workspace, you click its button in the workspace switch in the center of the Front Panel.
By default, four workspaces named One through Four are available.
Tip - You can specify whether an application is displayed on one or all workspaces by clicking mouse button 3 on its window frame and selecting an item from the pop-up menu.
Workspace Menu
When you click mouse button 3 on an unused area of a workspace, the Workspace menu is displayed. It includes items on the Front Panel and Application Manager. Most applications are on the Applications menu (see Figure 1-1).
Applications and Actions
In CDE you run an application by clicking its control on the Front Panel, by double-clicking its icon in Application Manager, or by choosing it from the Workspace menu.
You can also run an application by dropping the appropriate file on a drop zone on the Front Panel. For example, dropping a file on the printer icon prints the file.
You can also start an application by entering UNIX commands on a command line in a terminal window. To display a terminal window, choose This Host on the Hosts subpanel of the Front Panel.
About Application Manager
Application Manager enables you to organize applications for easy access by storing their icons in special folders. For example, you can launch your OpenWindows applications from icons in the OpenWindows folder (see Figure 1-2).
Working With Files
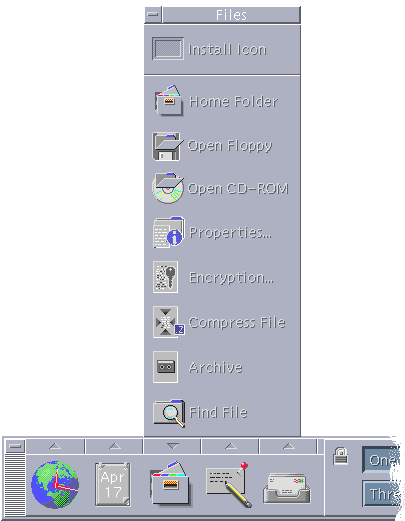
Like OpenWindows, CDE provides full-functioned File Manager and File Finder applications. The Files subpanel gives you access to these applications and to other file-related devices and applications.
Figure 1-3 Files Subpanel

In File Manager files and folders are represented by icons that indicate their types. Clicking on mouse button 3 displays options for the selected object, and double-clicking an object invokes the default action for that object. For example, double-clicking a compressed file expands it, and double-clicking on an audio file plays it.
| Task or Feature | OpenWindows Method | CDE Methods |
|---|---|---|
| To find a file | In File Manager, choose Find from the File menu | Click Find File on the Files subpanel |
| To carry out an action on a file | Click mouse button 3 and choose from general pop-up menu | Click mouse button 3 on the file and choose from pop-up menu Drag and drop the file on an appropriate drop zone Click a control on the Files subpanel |
| Print a file | Select file in File Manager and choose Print from the File menu | Drop a file on the printer control on Front Panel |
| Access a floppy diskette or CD-ROM | In File Manager, choose Check for Floppy from the File menu | Click Open Floppy or Open CD-ROM on the Files subpanel |
Deleting Files
Like OpenWindows, CDE provides a trash or wastebasket facility. The Trash Can is a temporary store for objects (files and folders) to be deleted.
You can move selected objects to the Trash Can using drag-and-drop, by mapping certain menu items, or by pressing the Delete key. Once in the Trash Can, the objects no longer appear in their original folder.
In OpenWindows, you are offered the opportunity to empty the wastebasket when you exit File Manager.
To permanently remove the deleted files in CDE, you use the Empty Trash Can control on the Trash subpanel. To permanently remove the deleted files in OpenWindows, you use the Empty Waste button in the Wastebasket application, or you accept an option to empty the wastebasket that is presented when you are exiting File Manager.


