


Example--Setting Printer Fault Recovery
The following example shows how to set up the printer luna to continue printing at the top of the page where printing stopped.
# lpadmin -p luna -F continue |
Limiting User Access to a Printer
You can control which users can access some or all of the available printers. For example, you can prevent some users from printing on a high-quality printer to minimize expense. To restrict user access to printers, you can create allow and deny lists using the lpadmin -u command on the print server. (Solaris Print Manager enables you to create only allow lists.) If you create neither, a printer is available to all users who can access the printer.
An allow list contains the names of users allowed access to the specified printer. A deny list contains the names of users denied access to the specified printer.
The rules for allow and deny lists are:
Allow and Deny List Rule | User Consequence |
|---|---|
Do not create allow and deny lists, or if you leave both lists empty | All users can access the printer. |
Specify all in the allow list | All users can access the printer. |
Specify all in the deny list | All users, except root and lp (on the server), are denied access to the printer. |
Make any entry in the allow list | The deny list is ignored. Only those users who are listed can access the printer. |
Create a deny list, but you do not create an allow list or you leave the allow list empty | Users who are listed in the deny list are denied access to the printer. |
Because the print server is actually controlling access to the printer, allow and deny lists can only be created on the print server itself. If you create allow and deny lists, the print server will exclusively control user access to printers.
The following table lists the values you can add to an allow or deny list to limit user access to a printer.
Table 5-5 Values for Allow and Deny Lists
Value for user-list | Description |
|---|---|
user | User on any system |
all | All users on all systems |
none | No user on any system |
system!user | User on system only |
!user | User on local system only |
all!user | User on any system |
all!all | All users on all systems |
system!all | All users on system |
!all | All users on local system |
 How to Limit User Access to a Printer
Log in as superuser, lp, or assume an equivalent role on the print server.
Allow or deny users access to a printer.
# lpadmin -p printer-name -u allow:user-list [ deny:user-list]
-p printer-name
Name of the printer to which the allow or deny user access list applies.
-u allow:user-list
User names to be added to the allow user access list. You can specify multiple user names with this command. Use a space or a comma to separate names. If you use spaces, enclose the list of names in quotes.
Table 5-5 provides the valid values for user-list.
-u deny:user-list
User names to be added to the deny user access list. You can specify multiple user names with this command. Use a space or a comma to separate names. If you use spaces, enclose the list of names in quotes.
Table 5-5 provides the valid values for user-list.
The specified users are added to the allow or deny user access list for the printer in one of the following files on the print server:
/etc/lp/printers/printer-name/users.allow
/etc/lp/printers/printer-name/users.deny
Note - If you specify none as the value for user-list in the allow user access list, the following files are not created for the print server:
/etc/lp/printers/printer-name/alert.sh
/etc/lp/printers/printer-name/alert.var
/etc/lp/printers/printer-name/users.allow
/etc/lp/printers/printer-name/users.deny
Check the information following the Users allowed or Users denied heading in the output of the following command.
$ lpstat -p printer-name -l
Examples--Limiting User Access to a Printer
The following example shows how to allow only nathan and george access to the printer luna.
# lpadmin -p luna -u allow:nathan,george |
The following example shows how to deny nathan and george access to the printer asteroid.
# lpadmin -p asteroid -u deny:"nathan george" |
Managing Print Requests
When a user submits a print request from a print client, the print request is added to a queue on the print server before it is sent to the printer. While a print request is in the queue, you can cancel or gain status information on the request from a client system. You must login to the print server to move, hold, resume, or change the priorities of print requests with LP commands. These actions can help you keep printing services operating smoothly.
The following table lists the values for changing the priority of a print request with the lp H command.
Table 5-6 Values for Changing the Priority of a Print Request
Value for -H change-priority | Description |
|---|---|
hold | Places the print request on hold until you cancel it or instruct the LP print service to resume printing the request. |
resume | Places a print request that has been on hold back in the queue. It will be printed according to its priority and placement in the queue. If you put a hold on a print job that is already printing, resume puts the print request at the head of the queue so it becomes the next request printed. |
immediate | Places a print request at the head of the queue. If a request is already printing, you can put it on hold to allow the next request to print immediately. |
How to Check the Status of Print Requests
Log in on any system on the network.
Check the status of printers and print requests.
Only the most commonly used options are shown here. For other valid options, see lpstat(1).
$ lpstat -o [list] | -u [user-list]
When used to check the status of print requests, the lpstat command displays one line for each print request. From left to right, the line shows the request ID, the user, the output size in bytes, the date and time of the request, and information about the request, such as "being filtered."
Examples--Checking the Status of Print Requests
The following example shows that user fred has one print request queued to the printer luna.
$ lpstat luna-1 fred 1261 Jul 12 17:34 |
The following example shows that the user paul currently has no print requests in queue.
$ lpstat -u paul |
The following example shows that there are two print requests on the printer moon.
$ lpstat -o moon moon-78 root 1024 Jul 14 09:07 moon-79 root 1024 Jul 14 09:08 |
Enabling or Disabling a Printer From Printing
The enable and disable commands control whether a printer prints or stops printing requests that are in the print queue. When you disable a printer, the printer stops printing requests in queue. However, requests are still added to the queue. (You must set the printer to reject print requests so requests are not added to the queue. For information about rejecting print requests, see "Accepting or Rejecting Print Requests".)
A printer is enabled to print and accepts print requests when it is added by using Solaris Print Manager. Solaris Print Manager doesn't provide any additional printer processing management.
You must enable the printer whenever it has been disabled, which can happen when a printer fault occurs. When you enable a printer, it prints requests from the print queue until the queue is empty, even if the print service rejects additional requests for the print queue.
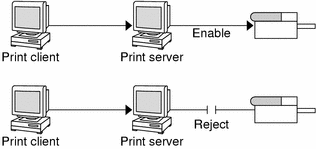
The following figure shows the point at which processing of print requests is interrupted when a printer is disabled.
Figure 5-1 What Happens When a Printer Is Enabled or Disabled
How to Enable or Disable a Printer
Log in as superuser, lp, or assume an equivalent role on the print server.
Stop printing print requests.
# disable [-c | -W] [-r "reason"] printer-name
Note - You cannot enable or disable classes of printers. Only individual printers can be enabled or disabled.
Start printing print requests.
# enable printer-name
Verify that the printer is enabled.
$ lpstat -p printer-name