| SunVTS 5.0 Test Reference Manual |
|
| SunVTS 5.0 Test Reference Manual |
|
| C H A P T E R 1 |
Introduction |
This manual describes SunVTS
TM
Version 5.0 tests that are distributed on the
Sun Computer Systems Supplement CD.
The Sun TM Validation and Test Suite (SunVTS) software runs multiple diagnostic hardware tests from a single user interface. SunVTS verifies the connectivity, functionality, and reliability of most hardware controllers and devices.
SunVTS is composed of many individual tests that support testing of a wide range of products and peripherals. Most of the tests are capable of testing devices in a 32-bit or 64-bit Solaris TM environment.
Use SunVTS to test one device or multiple devices. Some of the major test categories are:
Audio tests
Communication (serial and parallel) tests
Graphic/video tests
Memory tests
Network tests
Peripherals (disks, tape, CD-ROM, DVD-ROM, printer, floppy) tests
Processor tests
Storage tests
Such flexibility means that the proper test modes and options need to be selected to maximize its effectiveness. This book covers the individual test options and requirements. For overall test configuration modes and options refer to the SunVTS 5.0 User's Guide .
The default installation directory for SunVTS is /opt/SUNWvts. However, when you are installing SunVTS, you can specify a different directory. Refer to the SunVTS 5.0 User's Guide for installation information.
SunVTS version 5.0 was first introduced and designed to run in the Solaris 9 operating environment. It is recommended that you run SunVTS 5.0 in the Solaris 9 operating environment.
The operating system kernel must be configured to support all peripherals that are to be tested.
Some SunVTS tests have special requirements such as the connection of loopback connectors, installation of test media, or the availability of disk space. These requirements are listed for each test in the corresponding chapter in this book.
Many individual tests make up the collection of tests in the SunVTS application. Each test is a separate process from the SunVTS kernel. Each test can be run individually from the command line or from the SunVTS user interface.
When SunVTS is started, the SunVTS kernel automatically probes the system kernel to determine the hardware devices. The devices are then displayed on the SunVTS control panel with the appropriate tests and test options. This provides a quick check of your hardware configuration, and no time is wasted trying to run tests that are not applicable to your configuration.
During testing, the hardware tests send the test status and messages to the SunVTS kernel through interprocess communication ( IPC) protocols. The kernel passes the status to the user interface and logs the messages.
SunVTS has a shared object library that contains test-specific probing routines. At runtime, the SunVTS kernel dynamically links in and calls these probing routines to initialize its data structure with test-specific information. You can add new tests into the SunVTS environment without recompiling the SunVTS source code.
As of SunVTS 3.0, the SunVTS kernel and most tests support 32-bit and 64-bit operating environments. When the sunvts command is used to start SunVTS, the appropriate tests (32-bit or 64-bit versions) are presented.
Because each test is a separate program, you can run individual tests directly from the command line. When this is done, care must be taken to run the appropriate test (32-bit or 64-bit) that corresponds to the operating system that is running (32-bit or 64-bit). This is done by running tests from specific directories as follows:
|
Note - The SUNWvtsx package must be installed for 64-bit SunVTS support. For more information on SunVTS packages and installation procedures refer to the SunVTS 5.0 User's Guide. |
If you use the sunvts command to run SunVTS, SunVTS automatically allocates 32-bit or 64-bit tests based on the 32-bit or 64-bit Solaris operating environment that is running. Therefore, the only time that you need to be concerned with the 32-bit or 64-bit operation is when you run the SunVTS kernel or SunVTS tests from the command line.
If you are not sure which operating system is running, refer to the Solaris System Administration manuals. In Solaris 9, the following command can be used to identify the application support of your system.
|
Note Note - The isainfo command is not available in Solaris 2.6 or earlier releases. |
You can run SunVTS tests from various interfaces: The CDE graphical user interfaces, or the TTY interface. SunVTS tests can also be run individually from a shell tool command line, using the command-line syntax for each test (refer to Running a Test From the Command Line ). describes the various SunVTS user interfaces. Refer to the SunVTS 5.0 User's Guide for more information on these interfaces.
The common way to run SunVTS testing is through a SunVTS user interface--CDE or the TTY interface.
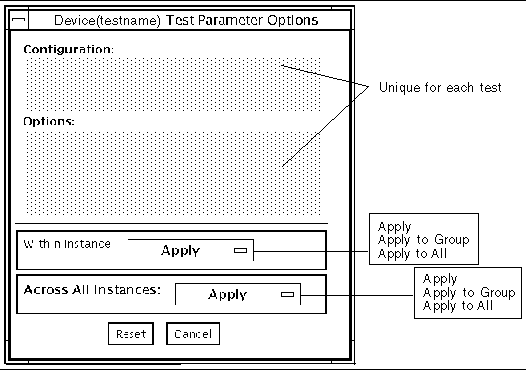
Test configuration, control, and results are easily accessed through buttons and dialog boxes. These buttons and dialog boxes are covered in the SunVTS User's Guide . However, the Test Parameter Options dialog box is unique for each test, and is therefore covered in this manual.
The options displayed in this menu differ for each test, but the lower set of buttons are generic and are described below.
|
Note Note - The Test Parameter Options Dialog Box descriptions also apply to the Test Parameter Options menu in the TTY interface. |
In some cases it may be more convenient to run a single SunVTS test from the command line rather than through a SunVTS user interface. The following information describes how to do this.
Unless specified, the test runs without the SunVTS kernel ( vtsk ). All events and errors are sent to stdout or stderr and are not logged in the log files.
When you run a test in this way, you must specify all test options in the form of command-line arguments.
There are two types of command-line arguments:
Test specific arguments--unique to a specific test. Refer to the test-specific chapters in this book for details.
The standard syntax for all SunVTS tests is:
testname [ - scruvdtelnf ] [ -i number ] [ -w number ] [ -o test_specific_arguments ]
|
Note Note - 64-bit tests are located in the sparcv9 subdirectory: /opt/SUNWvts/bin/sparcv9/testname. If a test is not present in this directory, then it may only be available as a 32-bit test. For more information refer to 32-Bit and 64-Bit Tests. |
The following table defines the standard SunVTS command-line arguments:
|
Note Note - Separate each test-specific argument by commas, with no space after each comma. |
|
Note Note - If you choose to specify a test mode with the l, n, or f option, specify only one option at a time because only one test mode can be selected at a time. |
There are test-specific arguments, as described in . Test-specific arguments follow the format specified in the getsubopt(3c) man page. For information about test-specific arguments refer to the specific test chapter in this book.
Before running a frame buffer test, determine whether the test requires frame buffer locking. Not all frame buffer tests have a locking option. Some tests set the lock automatically. Check the test chapter for each individual test to see if this step is needed. If locking is required, you can set the lock in one of two ways:
If you are using the CDE SunVTS interface, go to the Option menu of the graphic test and select Enable for the frame buffer locking option.
If you are working from the command line, you can enable frame buffer locking with the lock=e/d option. For example, to run the generic frame buffer test ( fbtest ) with a locked frame buffer, enter:
(See the test command line argument descriptions in this manual.)
 |
Caution Caution - If you are using the CDE interface for SunVTS, do not conduct frame buffer tests through the dtlogin window. Log in as root and disable the auto-logout option. |
 |
Caution Caution - Do not run TTY mode and frame buffer tests concurrently on the console monitor. The frame buffer test may fail. |
The following rules apply when you test multiple frame buffers (displays) simultaneously:
Only the console monitor can run the window environment (such as CDE). The console monitor is the monitor connected to the frame buffer appointed by
/dev/fb
. SunVTS enables frame buffer locking on the console monitor by default.
The frame buffer that is running the window environment must have window locking enabled to avoid false test failures. All other frame buffers must have window locking disabled.
If you start sunvts or vtsk from a screen other than the console monitor, frame buffer locking is not available. In this case:
Disable the window locking option on the remote screen by setting it to d .
Enable frame buffer locking for the console monitor, as shown in the example above. The SunVTS user interface cannot display on a monitor if locking is disabled.
Do not run any graphic programs (including vtsui ) on the remote frame buffer during graphic testing.
| SunVTS 5.0 Test Reference Manual | 816-1667-10 |
|
Copyright © 2002, Sun Microsystems, Inc. All rights reserved.

