


 To Find and Delete Text
Choose Find/Change from the Edit menu or press Control+F.
Type the text you want to delete in the Find field.
Leave the Change To field blank.
Press Return or click Find to locate the next occurrence.
Click Change to delete a single occurrence.
To find and change additional occurrences, click Find and then Change.
Or, click Change All to replace all occurrences.
Click Close when you are done.
Formatting and Printing Documents
Once your editing is complete, format your document by choosing margins and text alignment.
To Format a Document
Choose Settings from the Format menu.
Figure 12-13 Format Settings dialog box
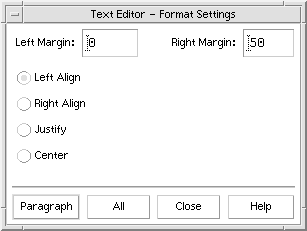
Enter margins.
The default left margin is 0 and the right margin is dynamically set to the width of the Text Editor window. Margins are specified as a number of character columns.
Select left, right, justify (block style), or center alignment.
Determine the scope of the formatting:
To format a single paragraph, place the cursor in the paragraph, then click Paragraph.
To format the entire document, click All.
After closing the dialog box, choose Paragraph or All from the Format menu to apply the settings.
To Print an Open Document
Open the document in Text Editor.
Choose Print from the File menu or press Control+P.
The Print dialog box displays the name of your system's printer and enables you to set printing options. By default, your document is printed on your system printer. If desired, you can direct your job to a different printer.
Figure 12-14 Print dialog box
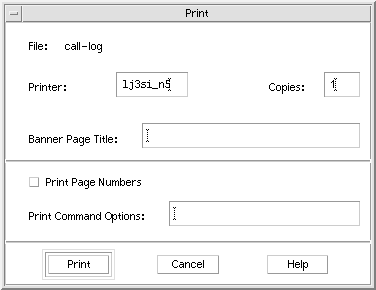
Optional. Set any of these printing options:
Type the number of copies to print.
Type text to appear on the printer banner page.
Click Print Page Numbers if you want to number the pages.
Type command-line printer options.
Click Print.
The Print dialog box closes when you print your document. To close the dialog box without printing your file, click Cancel.
To Print a Closed Document
Display the document's file icon in File Manager.
Drag the file icon to the Printer control in the Front Panel.
The Print dialog box is opened.
Optional. Set printing options.
Click Print.
Recovering a File
If Text Editor is interrupted due to a system error, it attempts to save your changes in a recovery file in your current folder. The recovery file is named #filename#, where filename is the name of the document. If you had never named your document, the recovery file name is #UNTITLED#.
To Recover a File
Start Text Editor.
Open the recovery file.
Save the document using your original file name or provide a new name for a previously unsaved document.
Text Editor and Other Applications
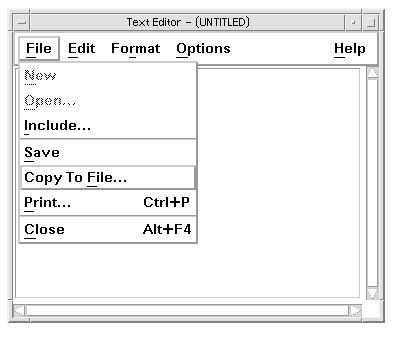
Other applications can use Text Editor as a tool to edit documents or other types of information. Under certain conditions, an application may choose to restrict your editing choices. In the example below, the File menu has been modified. The Save As command has been replaced with a Copy To File command and the New and Open commands are not available.
Figure 12-15 Text Editor with modified File menu
Using Text Note
When you click the Text Note control on the Front Panel, Text Editor opens in note mode; this enables you to type some text and post it on the Workspace for fast retrieval. If you exit Text Editor while it is in note mode, the text note is saved in your home folder and displayed as an icon on the Workspace backdrop. You can reopen a text note by double-clicking its icon on the Workspace.
To Type a Text Note
Click the Text Note control on the Front Panel.
Text Editor is opens in note mode.
Type your note.
Choose Close from the File menu.
The Save dialog box is displayed.
Choose Yes to save changes.
The text note is put on the Workspace.