


Using the Tree View
The tree view resembles an outline. Files and folders contained in a folder are listed beneath that folder in an indented list
Figure 5-4 File Manager Tree View
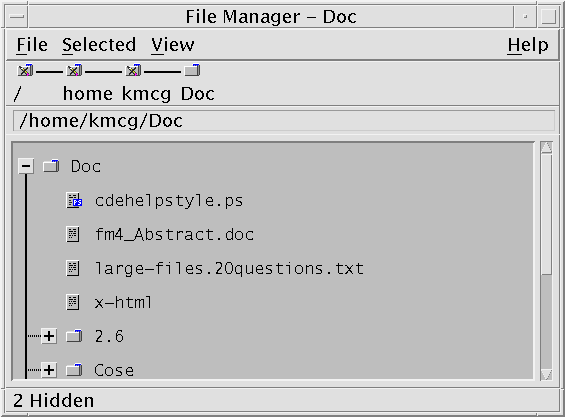
In the tree view, a folder can have three states. The states are shown and changed using the buttons to the left of the folder. You can also open and close the tree branches by selecting a folder and then pressing the + and - keys on your keyboard (these are the keys in the center, not the numeric keypad):
+()- The folder is in its closed state. None of the folder's contents are shown. Clicking the button expands the folder partially or fully, depending on the tree view option currently in effect.
-()- The folder is in its fully expanded state. All objects in the folder are shown. Clicking the button fully closes the folder.
+/-()- The folder is in its partially expanded state. The only contents shown are the folders it contains. (This view is possible only when viewing "Folders, then Files".) Clicking the button expands the folder to show the file names.
You can alter the appearance of files and folders in the tree view by changing the settings in the Show box in the Set View Options dialog box. Changes to the preferences are only for the current session. To make them permanent, see "To Save the Current Preferences as Your Default".
If you double-click a folder in tree view, a new view of that folder opens that is not in tree view mode.
 To Display the Tree View
The tree view shows a folder and the files and folders beneath it.
Change to the folder where you want the tree view to start.
Choose Set View Options from the View menu.
Select By Tree in the Show box.
Select one of the tree view options:
Folders only - The tree shows folders only. To view files, double-click a folder name. This is the default view.
Folders, then Files - Folders only appear at first. Click the [+] button next to each folder to view its contents. The first click shows subfolders. A second click shows files that are inside. When you click the button a third time, the folder contracts again.
Folders and Files - The tree shows both folders and files automatically.
To implement the chosen options and close the Set View Options dialog box, click OK. To implement the chosen options and leave the Set View Options dialog box open, click Apply.
To Display the Folder View
The folder view will show a folder and all the files and folders in that folder.
Change to the folder that you want to view.
Choose Set View Options from the View menu.
Select By Single Folder in the Show box.
To implement the chosen options and close the Set View Options dialog box, click OK. To implement the chosen options and leave the Set View Options dialog box open, click Apply.
You can alter the appearance of files and folders in the folder view by changing the settings in the Show box in the Set View Options dialog box. Changes to the preferences are only for the current session. To make them permanent, see "To Save the Current Preferences as Your Default".
To Change How Objects Are Represented
Choose Set View Options from the View menu.
Select the representation you prefer from the Representation box.
By Name Only - Icons will not be displayed in File Manager. File Manager indicates objects that are folders by adding a slash (/) after their names. Executable programs have an asterisk (*) after their name.
By Large Icons - This is the default. The objects in File Manager will appear with their names and large icons.
By Small Icons - The objects in File Manager will appear with their names and small icons.
By Name, date, size, ... - The objects in File Manager will appear with date, size, and so on in addition to the file names and icons.
To Change the Order in Which Icons Are Sorted
Choose Set View Options from the View menu.
Select the sort order you prefer from the Order box, and the direction from the Direction box.
Alphabetically - A to Z (Ascending) or Z to A (Descending). Icons with names that start with capital letters appear first. Icons with names that start with lowercase letters are at the bottom.
By File Type - By object type. For example, files, folders and actions are different types of objects. Within each group of the same type, the icons are sorted alphabetically (based on the order the data types are read into the database).
By Date - By date the files were last modified, oldest to newest (Ascending) or newest to oldest (Descending).
By Size - By file size, smallest to largest (Ascending) or largest to smallest (Descending).
If you have Placement set to As Placed, icons are sorted only when you choose Clean Up from the View menu or when you click Apply in the Set View Options dialog box. If Placement is set to Rows and Columns, the icons are sorted each time there's a change to the folder's contents, or when you choose Update from the View menu.