


Finding a File by File Properties
The previous procedures explained how to search for a file or folder by specifying a name, and how to search for a file by specifying some of its contents. You can also specify the following object properties as search criteria:
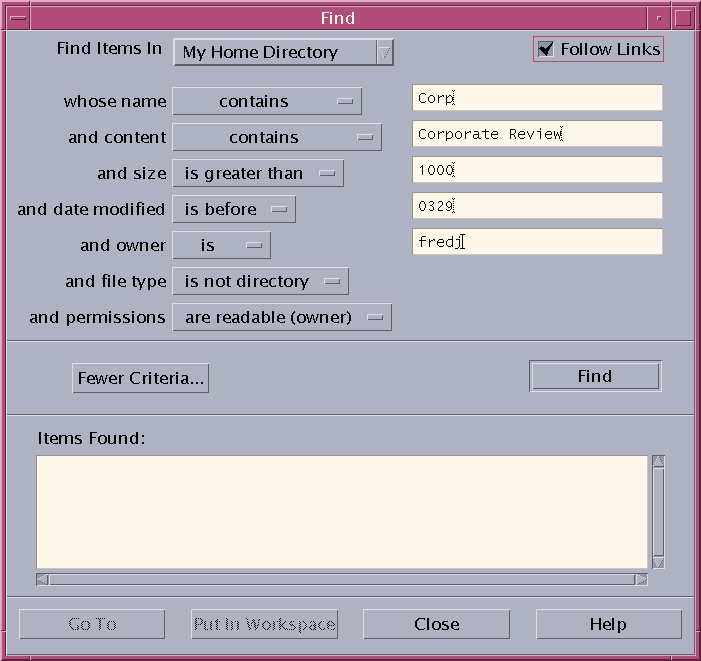
Size - Specify a file size in characters. Append the character "c" to the size you specify to return a file size in characters (as displayed in File Manager). If this line is displayed and left blank, qualifying objects of all sizes will be returned.
Owner - Specify an exact UNIX user name for the object's owner. If this line is displayed and left blank, qualifying objects belonging to all users will be returned.
Date modified - Specify a date using the date specification format [[CC]YY]MMDD[hhmm][.SS]. Entries enclosed by square brackets are optional. If this line is displayed and left blank or left with the above prompt string, qualifying objects of all modification dates will be returned.
Type - Choose whether to return files or folders. If this line is displayed, qualifying objects of only the type selected will be returned. Otherwise, qualifying objects of both types will be returned.
Permissions - Select one of the options which relate to the ACL (Access Control List) If this line is displayed, qualifying objects of only the type selected will be returned. Otherwise, qualifying objects of all types will be returned (subject to other constraints).
By default, File Finder displays only the line for specifying name criteria. By clicking More Criteria, you can display lines for other criteria.
Figure 5-3 File Finder With All Search Criteria Displayed
 To Find a File by File Properties
Open File Finder.
File Finder opens with the default display and settings.
Click More Criteria to display the More Criteria dialog box.
Select the check boxes for the criteria that you intend specifying in your search.
File Finder updates the Find dialog box to contain a line for specifying each of the selected criteria.
(Optional) Specify the folder to be searched, the name of the file or folder, and the contents of the required file using the instructions in "To Find a File or Folder by Name" and "To Find a File by Contents".
Specify criteria relating to the properties of the file or folder on the lines provided.
Each line of constraints will be evaluated as described above. If you use more than one set of criteria, File Finder will return only objects that satisfy all of the search criteria.
When you are satisfied with the criteria you have entered, click Find.
File Finder searches the specified folders and subfolders, and returns a list of the files and folders that match all of the specified search criteria. You can stop the search at any time by clicking Stop.
Tip - If too many files are returned, you can specify more restrictive criteria and try again.
Customizing File Manager Views
File Manager provides several ways to see the contents of folders. You can:
Change the basic viewing structure from one folder at a time to seeing a tree view see "To Display the Tree View").
Determine the sort order of objects (see "To Change the Order in Which Icons Are Sorted").
Hide (filter) certain objects (see "To Show or Hide Files and Folders").
Change the style used for objects - names and small or large icons, names alone, or a long list of names plus properties.
To Configure the Headers
Choose Set View Options from the View menu.
Determine which headers to display:
Select Iconic Path to show current folder path as a string of folder icons at the top of the window.
Select Text Path to show the current folder's full path name in a text field above the view pane.
Select Message Line to show a count of the number of files in the folder. The line will appear at the bottom of the window.
To implement the chosen option and close the Set View Options dialog box, click OK.
To implement the chosen option and leave the Set View Options dialog box open, click Apply.
To Configure How Icons are Placed
Determine how you want to have the icons placed:
Select As Placed to leave icons where they are dropped.
Select Rows and Columns to automatically align the icons you drop into a grid.
To implement the chosen option and close the Set View Options dialog box, click OK. To implement the chosen option and leave the Set View Options dialog box open, click Apply.