


Navigating to Folders and Subfolders
Each File Manager window (also called a view) shows the contents of a single folder.
If you are not familiar with hierarchical file systems, see "Basic File System Concepts".
 To Change to Another Folder
You can change to another folder in any of the following ways:
Double-click a folder icon.
Select a folder icon and choose Open In Place from the Selected menu to open the folder in the current window, or Open New View from the Selected menu to open it in a new window.
Choose the Open In Place or Open New View command from the folder's pop-up menu (displayed by pressing Shift+F10 or mouse button 3).
Double-click a folder in the iconic path to change the view to that folder.
Select (click) the current folder line to change it into a text field. Type the name of the path you want and then press Return.
In the current folder line, double-click a segment of the current path. For example, if the current folder is /users/fredj/.dt/types, you can change to the /users/fredj folder by double-clicking the word fredj.
Choose Go To from the File menu. Enter the folder's full path name in the Destination Folder text field of the Go To window.
To Go to Your Home Folder
To Change to the Parent Folder
Choose Go Up from the File menu
To Open a Terminal Window in the Current Folder
This procedure opens a terminal emulator window with the same current folder as the File Manager window. This is a quick way to type a command to affect the contents of the folder you are currently viewing.
Note - You must have execute permission for a folder before you can open a Terminal window from it.
To find out how to use terminal emulators, see Chapter 14, Using Terminal .
Executing an Action for a File or Folder
Actions act on objects, and are a basic part of working with them. For example, printing the contents of an object uses the Print action. Starting an application for a data file object uses an Open action, or some other application action.
The Selected menu contains a list of commands followed by a list of actions you can use with the selected icon. The contents of the actions portion of the Selected menu change depending on the type of icon that is currently selected.
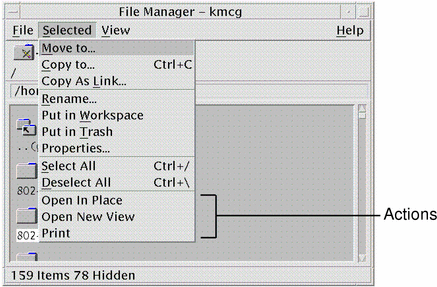
The action listed at the top of the action portion of the menu (the default action) is the action that will be taken when you double-click a file or folder. In the menu shown in the figure, the default action is Open In Place.
To Execute the Default Action
The default action is the first action listed in the actions portion of the Selected menu.
To Execute Other Actions
Select the object's icon.
Choose the action you want to execute from the Selected menu or from the object's pop-up menu.
Deleting Objects to the Trash Can
The Trash Can collects the files and folders that you delete. They are not actually removed from the file system until the trash is "emptied." You can only change your mind and restore a file you've put in the Trash Can if the Trash Can hasn't been emptied.
To Open the Trash Can Window

To Put an Object in the Trash Can
Choose Put in Trash from the object's pop-up menu (displayed by pressing Shift+F10 or mouse button 3).
Or, select the object's icon, then choose Put in Trash from the Selected menu.
Or, drag the object's icon and drop it onto the Trash Can control in the Front Panel.
Or, drag an object's icon to the open Trash Can window.
To Put Back a File or Folder from the Trash Can
Drag the object from the Trash Can window to File Manager.
Or, in the Trash Can window, select the object you want to restore and choose Put back from the File menu.
Or, choose Put back from the object's pop-up menu (displayed by pressing Shift+F10 or mouse button 3).