Managing Tape Drives (Tasks)
This chapter describes how to manage tape drives.
This is a list of the step-by-step instructions in this chapter:
Choosing Which Media to Use
You typically back up Solaris systems using the following:
1/2-inch reel tape
1/4-inch streaming cartridge tape
8-mm cartridge tape
4-mm cartridge tape (DAT)
You can perform backups with diskettes, but doing so is time-consuming and cumbersome.
The media you choose depends on the availability of the equipment that supports it and of the media (usually tape) that you use to store the files. Although you must do the backup from a local system, you can write the files to a remote device.
The following table shows typical media that is used for backing up file systems and shows the storage capacity for each media. Capacity depends on the type of drive and the data being written to the tape.
Table 51-1 Media Storage Capacities
Media | Capacity |
|---|---|
1/2-inch reel tape | 140 Mbytes (6250 bpi) |
2.5-Gbyte 1/4 inch cartridge (QIC) tape | 2.5 Gbytes |
DDS3 4-mm cartridge tape (DAT) | 12-24 Gbytes |
14-Gbyte 8-mm cartridge tape | 14 Gbytes |
DLT™ 7000 1/2-inch cartridge tape | 35-70 Gbytes |
Backup Device Names
You specify a tape or diskette to use for backup by supplying a logical device name. This name points to the subdirectory that contains the "raw" device file and includes the logical unit number of the drive. Tape drive naming conventions use a logical, not a physical, device name. The following table shows this naming scheme.
Table 51-2 Basic Device Names for Backup Devices
Device Type | Name |
|---|---|
Tape | /dev/rmt/n |
Diskette | /vol/dev/rdiskette0/unlabeled |
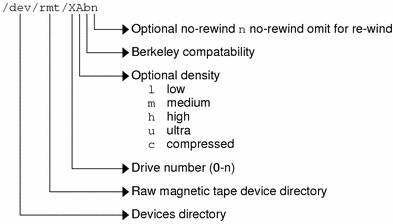
In general, you specify a tape drive device as shown in the following figure.
Figure 51-1 Tape Drive Device Names

If you don't specify the density, a tape drive typicallys write at its "preferred" density, which usually means the highest density it supports. Most SCSI drives can automatically sense the density or format on the tape and read it accordingly. To determine the different densities that are supported for a drive, look at the /dev/rmt subdirectory. This subdirectory includes the set of tape device files that support different output densities for each tape.
Also, a SCSI controller can have a maximum of seven SCSI tape drives.
Specifying the Rewind Option for a Tape Drive
Normally, you specify a tape drive by its logical unit number, which can run from 0 to n. The following table describes how to specify tape device names with a rewind or no rewind option.
Table 51-3 Specifying Rewind or No-Rewind for a Tape Drive
Drive and Rewind Value | Use This Option |
|---|---|
First drive, rewind | /dev/rmt/0 |
First drive, no rewind | /dev/rmt/0n |
Second drive, rewind | /dev/rmt/1 |
Second drive, no rewind | /dev/rmt/1n |
Specifying Different Densities for a Tape Drive
By default, the drive writes at its "preferred" density, which is usually the highest density it supports. If you do not specify a tape device, the command writes to drive number 0 at the default density the device supports.
To transport a tape to a system whose tape drive supports only a certain density, specify a device name that writes at the desired density. The following table describes how to specify different densities for a tape drive.
Table 51-4 Specifying Different Densities for a Tape Drive
Drive, Density, and Rewind Value | Use this Option |
|---|---|
First drive, low density, rewind | /dev/rmt/0l |
First drive, low density, no rewind | /dev/rmt/0ln |
Second drive, medium density, rewind | /dev/rmt/1m |
Second drive, medium density, no rewind | /dev/rmt/1mn |
The unit and density characters are shown in "Backup Device Names".
Displaying Tape Drive Status
You can use the status option with the mt command to get status information about tape drives. The mt command reports information about any tape drives that are described in the /kernel/drv/st.conf file.
 How to Display Tape Drive Status
Load a tape into the drive you want information about.
Display tape drive status with the mt command.
# mt -f /dev/rmt/n status
Repeat steps 1-2, substituting tape drive numbers 1, 2, 3, and so on to display information about all available tape drives.
Example--Displaying Tape Drive Status
The following example shows the status for a QIC-150 tape drive (/dev/rmt/0) and an Exabyte tape drive (/dev/rmt/1).
$ mt -f /dev/rmt/0 status Archive QIC-150 tape drive: sense key(0x0)= No Additional Sense residual= 0 retries= 0 file no= 0 block no= 0 $ mt -f /dev/rmt/1 status Exabyte EXB-8200 8mm tape drive: sense key(0x0)= NO Additional Sense residual= 0 retries= 0 file no= 0 block no= 0 |
The following example shows a quick way to poll a system and locate all of its tape drives.
$ for drive in 0 1 2 3 4 5 6 7 > do > mt -f /dev/rmt/$drive status > done Archive QIC-150 tape drive: sense key(0x0)= No Additional Sense residual= 0 retries= 0 file no= 0 block no= 0 /dev/rmt/1: No such file or directory /dev/rmt/2: No such file or directory /dev/rmt/3: No such file or directory /dev/rmt/4: No such file or directory /dev/rmt/5: No such file or directory /dev/rmt/6: No such file or directory /dev/rmt/7: No such file or directory $ |


