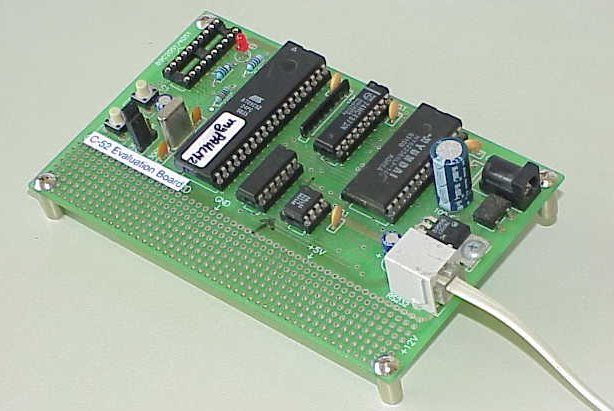
C-52 EValuation Board
Wichit Sirichote, kswichit@kmitl.ac.th
Build your own a low-cost learning
board C-52 EVB for studying Assembly and C language programing. The board
features 89C52 with 8kB PAULMON2 monitor program, 32kB RAM, and two 8-bit
ports P1 and P3.
Introduction
I have designed the C-52 EVB to be used as a learning tool
in the class "Assembly and C programming for Microcontroller". This page
provides materials for building the board. Students may build the board
by themselves to practice learning by doing. The C-52 EVB has a 89C52 with
8kB PAULMON2 monitor program, 32kB SRAM, and two 8-bit ports P1 and P3.
There is no 7-segment display and hex key pad, entering hex code or intel
HEX file to the test RAM thus needs a PC running terminal emulation program
TVI 920, say.
Hardware
A circuit diagram of the C-52 EVB is depicted in Figure 1.
See at EA pin first, I put EA to Vcc configuring the 89C52 started internal
code execution when reset. The first 8kB code space, 0000H-1FFFH is then
be a monitor program, i.e., PAULMON2. A 32kB SRAM 62256 uses 15 lines address,
A0-A14, while A15 of the 89C52 connects inverter gate, 74HC00, to CE pin.
This makes the address space of the SRAM to be 8000H-FFFFH, i.e., A15 must
be '1' to enable 62256. See OE pin, RD and PSEN are tied together with
AND gate made by two NAND gates. This makes the address space 8000H-FFFFH
seen by 89C52 can be external code and data memory. Thus during in monitor
mode that runs under PAULMON2, user may write hex code or download intel
HEX file to 62256. When jump from PAULMON2 to user program and run user
program, this space is then be seen by 89C52 as a code space. Since P0
and P2 are used for connecting external RAM, left P1 and P3 for experimenting
with real world interfacing through input/output port. Nowadays there are
many peripheral chips that use serial protocol, say I2C, SPI. Thus only
two port is surely enough.
 Figure 1: Circuit Diagram of C-52 Evaluation Board
Constructing the Board
I have used a universal PCB for wiring the circuit. It took
an hour, not so difficult. I have also asked my student using Protel to
make PCB. Please wait the latest layout. I will put it here soon.
Software
Since the external ram space is from 8000H-FFFFH, code space
is from 0000H-1FFFH, my design uses on-chip code space, thus no longer
need external EPROM. Students need a chip writer, say Easy-Downloader
V2.0 for writing the hex file to the 89C52 chip.
PAULMON2
document details how to use monitor command and useful information.

SOFTWARE UPDATING 18 August
2542
Get software tools;
myPAULM2.hex is intel hex file
of "myPAULM2.asm" and "myEXTRA.asm",
modified version of PAULMON2 monitor program. The fancy editor was cut
and the following functions was added;
1) return address to monitor by using 'JMP monitor'
where monitor address was defined in myPAULM2.EQU and,
2) baud rate was fixed at 9600 8n1, this allows the use
of C-52 EVB to be a dedicated controller by using Paul's concept of PROGRAM
HEADER w/start-up method and a 32kB NVRAM. PAULMON2 Program Header describes
four types of user program. With hardware start-up type and fixed baud
rate, user program will run when power up after some initialization.
3) I have put a subroutine that get integer number from
terminal and return 16-bit integer in BA, i.e., B accumulator holds
high byte, A for low byte. Main program may use 'CALL getnum'. The absolute
address of getnum subroutine was defined in my latest myPAULM2.EQU
file. This subroutine will use in experimenting with assembly program.
ASM51.ZIP (157,660 bytes WinZip File)
Assembler and Terminal Emulation Program.
Testing the Board
Before putting all of the chips, plugs DC adapter, then check
+5V supply every chips. If ok then pull the DC jack out then put all the
chips to the sockets. Now run terminal emulation program, press enter key,
the prompt will show on screen. Type ? for help command, Figure 3 shows
example of disassemble hex code via List command. Figure 4 shows downloading
and running demo.hex, see return to monitor and printout of Accumulator
& PSW.
 Figure 3: Example of Disassemble Hex code via
List Command
Figure 3: Example of Disassemble Hex code via
List Command
 Figure 4: Running demo.hex then return to monitor
Figure 5: Running hello.hex ,
the source file hello.c was compiled by C51 compiler.
Acknowledgment
I would like to express my gratitude to Paul
Stoffregen for a very nice and useful monitor program, PAULMON2.
Build
Your Own uC Projects
Last updated, 18 August 2542