 To Change File or Folder Ownership
Note - If you do not have permission to change the properties, some of the controls in the Permissions dialog box are unavailable.
In File Manager, select the icon of the file or folder whose ownership you want to modify.
Choose Properties from the File Manager Selected menu or from the icon's pop-up menu (displayed by pressing Shift+F10 or mouse button 3).
The Permissions dialog box appears.
To change the owner, type the new owner name into the Owner text field. To change the owning group, type the new group name into the Group text field.
You can specify a different owning group only if you are also a member of another group, even if you are not the file or folder owner.
Click OK to apply the current settings and dismiss the dialog box. Click Apply to apply the settings without dismissing the Permissions dialog box.
 To Browse and Edit Properties of Multiple Files and Folders
Open the Properties dialog box by typing sdtfprop& at the command line.
You can edit the File Name text field and click Browse to open the File Selection dialog box only if you open the Properties dialog box from the command line.
Click Browse or type the name of a file or folder in the File Name field.
Browse or edit the file or folder properties.
Click OK to apply the current settings and dismiss the dialog box. Click Apply to apply the settings and continue the browsing and editing process.
Access Control Lists
ACLs enable you to define file or folder permissions for the owner, owner's group, others, and specific users and groups, and default permissions for each of these categories. You can set up only one ACL per file or folder. An ACL consists of ACL entries. Each entry has a user type associated with it, much as basic permissions have Owner, Group, or Other associated with them.
If you want to grant file or folder access to a particular user or group, use the User or Group type ACL entry, respectively. You must specify the name of the user or group when you create the ACL entry. For example, you can use an ACL to grant a friend read permission on your resume, while protecting it from being read by the rest of the world (besides yourself).
To create, modify, or view ACLs on a file or folder, it must reside on a server or system running Solaris 2.5 Operating Environment or compatible versions, and you must be running Solaris 2.5 Operating Environment or compatible versions. Such files and folders are called ACL-enabled. To set, modify, and view basic permissions and ACLs using the Properties Graphical User Interface (GUI), you must be running CDE 1.1 or later.

You must be the owner of the file or folder to create or modify basic permissions or ACLs for that file or folder. If you are not the owner, all fields in the Properties dialog box are displayed as read-only.
Note - ACL terminology in this section refers to terminology used in the Properties GUI. Command-line terminology may be slightly different.
 To View an Access Control List
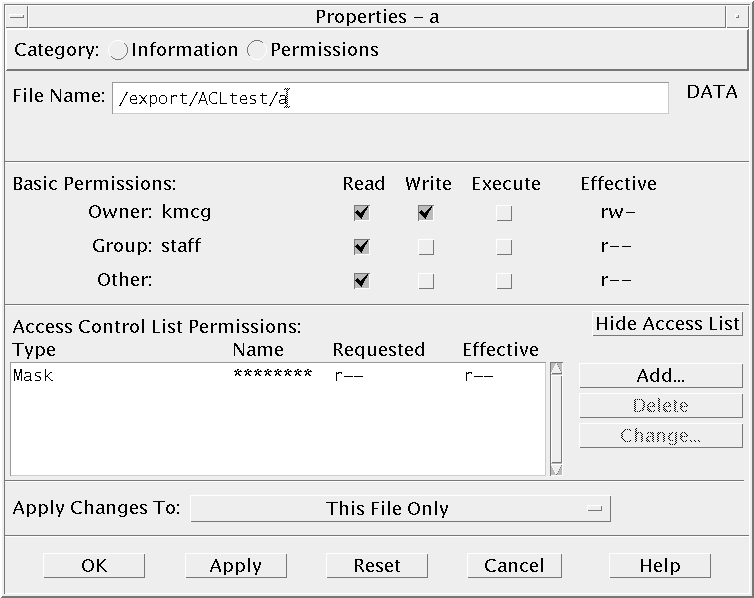
In File Manager, select the icon of the file or folder whose Access Control List (ACL) you want to view.
Choose Properties from the File Manager Selected menu or from the icon's pop-up menu (displayed by pressing Shift+F10 or mouse button 3).
The Properties dialog box appears.
If the file or folder has an ACL, it appears in the scrolling list labeled Access Control List Permissions. If the file or folder has no ACL, the scrolling list is hidden.
The Requested column shows the permissions that the owner requests for each ACL entry. These permissions are restricted by the mask, and the actual ACL entry permissions appear in the Effective column. See "Permissions Mask" for a discussion of the mask.
Note - To create, modify, or view ACLs on a file or folder, it must reside on a server or system running Solaris 2.5 Operating Environment or compatible systems, and you must be running Solaris 2.5 Operating Environment or compatible systems.
 To Add an Access Control List Entry
Note - Adding the first Access Control List entry creates the Access Control List.
In File Manager, select the icon of the file or folder whose ACL you want to modify.
Choose Properties from the File Manager Selected menu or from the icon's pop-up menu (displayed by pressing Shift+F10 or mouse button 3).
The Permissions dialog box appears.
Click Show Access Control List if the ACL portion of the Permissions dialog box is not visible.
Click the Add button.
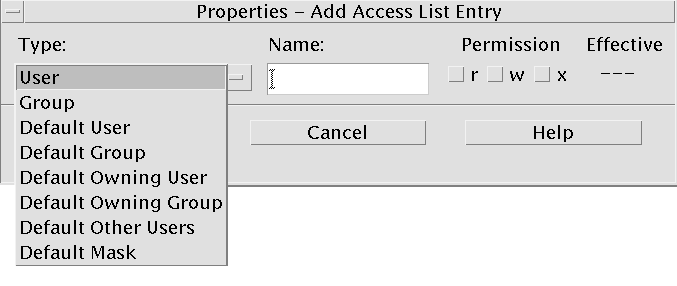
The Add Access List Entry dialog box appears.

Select an option from the Type option button.
Enter the name associated with the chosen Type, if it has one in the Name field.
Click the Permission check boxes to reflect the values you want for the new ACL entry.
The status line at the bottom of the dialog box informs you if the permissions you request are restricted by the mask.
Click Add in the Add Access List Entry dialog box.
Use the Apply Changes To option button to choose the scope of the change.
For files, the options are This File Only (default), All Files in Parent Folder, and All Files in Parent Folder and its Subfolders. For folders, the options are This folder only (default) and This folder and its Subfolders.
Click OK to apply the current settings and dismiss the dialog box. Click Apply to apply the settings without dismissing the dialog box.
 To Change an Access Control List Entry
In File Manager, select the icon of the file or folder for which you want to change an ACL entry.
Choose Properties from the File Manager Selected menu or from the icon's pop-up menu (displayed by pressing Shift+F10 or mouse button 3).
The Permissions dialog box appears.
Select the entry in the Access Control List Permissions scrolling list that you want to change.
Click Change.
The Change Access List Entry dialog box appears.

Click the Permission check boxes to reflect the values you want for the ACL entry.
The status line at the bottom of the dialog box informs you if the permissions you request are restricted by the mask.
Click the Change button in the Change Access List Entry dialog box.
Use the Apply Changes To option button to choose the scope of the change.
For files, the options are This File Only (default), All Files in Parent Folder, and All Files in Parent Folder and its Subfolders. For folders, the options are This folder only (default) and This folder and its Subfolders.
Click OK to apply the current settings and dismiss the dialog box. Click Apply to apply the settings without dismissing the dialog box.


