


 To Find a Process
Type your search text into the Find drop-down box, or select a previously used search text from the Find drop-down list.
Your search text should be a string of characters that is common to the process entries of all of the processes you want to display.
Press Return to highlight the first occurrence of the search text below the current cursor position.
The text can be in any of the fields in the process entry.
Press Return to highlight the next occurrence, and so on.
When you have found the required process entry, clear the Find field.
Note - When you reach the end of the scrolling pane, search does not revert to the top of the list. Therefore, to ensure you search all processes, select the first process entry in the list before typing your search text in the Find box.
To Change the Sort Order of the Display
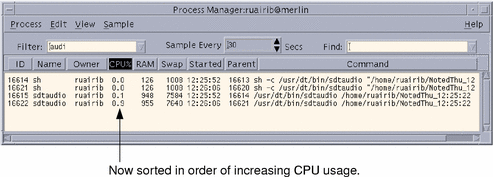
By default, Process Manager lists the process entries in order of decreasing CPU usage. You can tell this because the column heading over the CPU usage column (CPU%) is depressed, while the other column headings are not.
To select the column on which the list of process entries is to be sorted, click the relevant column heading or choose the column name from the View menu.
Process Manager sorts the list of process entries and displays them in the new order. The default ordering for each column is indicated in the following table.
Table 19-1 Default Display Order for Process Entries
Selected Column Heading Method ID Sorts numerically by process ID in increasing order Name Sorts alphabetically by process name Owner Sorts alphabetically by owner name CPU% Sorts numerically by CPU usage in decreasing order RAM Sorts numerically by RAM usage in decreasing order Swap Sorts numerically by swap space usage in decreasing order Started Sorts chronologically by actual start time in decreasing order Parent Sorts numerically by process ID number of parent process in decreasing order Command Sorts alphanumerically by full path name in decreasing order ( characters such as / have a lower sort value than letters) (Optional) To reverse the sort order for any one of these columns (for example, to sort by RAM usage in increasing order), click the depressed column heading button.
The column heading area will turn black and sort the display in the reverse order.
To Change the Sampling Interval
By default, Process Manager samples the workstation and updates the display every 30 seconds.
To disable/enable the continuous sampling mode, choose Stop/Start from the Sample menu.
If continuous sampling is on, you will see a Stop menu item on the Sample menu; otherwise the menu item will read Start.
To change the interval between samples, type a number of seconds (up to 604800, that is, 14 days) in the Sample Every box.
Press Return to make the new sampling frequency come into effect.
To sample immediately, choose Now from the Sample menu.
Process Manager samples and then updates the display.
Copying and Saving
You can select and copy one or more of the process entries in the display, and paste the text into other applications.
You also have the following options for saving the sample data to files:
Creating a new file containing only the current sample
Setting up a log file to which each new sample is appended
To Create a File Containing the Current Sample
Choose Save As from the Sample Menu.
Process Manager displays the Save As dialog box.
Specify the name and location of a new file and click OK.
Process Manager creates the text file containing the process entries from the current display.
To Set Up a Log File
Choose Log File from the Sample menu.
Process Manager displays the Log File dialog box.
Specify the name and location of a new file and click OK.
Process Manager creates the text file and appends each new sample (with header information) to the file.
 Caution - Process Manager will continue to append
to this file until you terminate the Process Manager application, or until
you choose Stop Logging from the Sample menu.
Caution - Process Manager will continue to append
to this file until you terminate the Process Manager application, or until
you choose Stop Logging from the Sample menu.
Performing Actions on a Selected Process
When you have identified and selected a process entry in the list, you can perform these actions on the process:
Send a kill signal to terminate the process or invoke a response
Search for more information about the owner in Address Manager
Trace system calls, display child processes, or run a debugger
Show its stack or its ancestors
Caution - Consult your system administrator if you do not understand
the implications of carrying out any of these procedures.