


Using The CacheFS File System (Tasks)
This chapter describes how to set up and maintain CacheFS™ file systems.
This is a list of task maps in this chapter.
For information on troubleshooting CacheFS errors, see "Troubleshooting cachefspack Errors".
High-Level View of Using the CacheFS File System (Task Map)
Use this task map to identify all the tasks for using CacheFS file systems. Each task in this map points to a series of additional tasks such as creating and mounting the CacheFS file systems, and packing and maintaining the cache.
Task | Description | For Instructions |
|---|---|---|
1. Create and mount a CacheFS file system | Create the cache and mount the file system in the cache. | |
2. Maintain a CacheFS file system | Display and modify a CacheFS file system by unmounting, removing, or re-creating the cache. | |
3. (Optional) Pack and unpack a CacheFS file system | Determine whether you want to pack the cache and use packing lists. Packing the cache ensures that certain files and directories are always updated in the cache. | |
4. Collect CacheFS statistics | Determine cache performance and appropriate cache size. |
Overview of the CacheFS File System
The CacheFS file system is a general purpose caching mechanism that improves NFS server performance and scalability by reducing server and network load. Designed as a layered file system, the CacheFS file system provides the ability to cache one file system on another. In an NFS environment, the CacheFS file system increases the client per server ratio, reduces server and network loads, and improves performance for clients on slow links, such as Point-to-Point Protocol (PPP).
How a CacheFS File System Works
You create a CacheFS file system on a client system so that file systems you cache can be accessed by the client locally instead of across the network. The following figure shows the relationship of the components that are involved in using CacheFS file system.
Figure 40-1 How a CacheFS File System Works
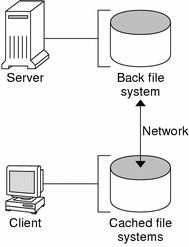
The back file system is the file system that you specify to be mounted in the cache, which can be either NFS or HSFS (High Sierra File System). When the user attempts to access files that are part of the back file system, those files are placed in the cache. The front file system is the file system that is mounted in the cache and is accessed from the local mount point. The front file system type must be UFS.
To the user, the initial request to access a file in a CacheFS file system might seem slow, but subsequent uses of the same file are faster.
CacheFS File System Structure and Behavior
Each cache has a set of parameters that determines how it behaves and its structure. The parameters are set to default values which are listed in the following table. The default values specify that the entire front file system is used for caching, which is the recommended method of caching file systems.
Table 40-1 CacheFS File System Parameters and Their Default Values
CacheFS File System Parameter | Default Value | Definition |
|---|---|---|
maxblocks | 90% | Sets the maximum number of blocks that a CacheFS file system is allowed to claim within the front file system. |
minblocks | 0% | Sets the minimum number of blocks that a CacheFS file system is allowed to claim within the front file system. |
threshblocks | 85% | Sets the number of blocks that must be available in the front file system before a CacheFS file system can claim more than the blocks specified by minblocks. |
maxfiles | 90% | Sets the maximum number of available inodes (number of files) that a CacheFS file system is allowed to claim within the front file system. |
minfiles | 0% | Sets the minimum number of available inodes (number of files) that a CacheFS file system is allowed to claim within the front file system. |
threshfiles | 85% | Sets the number of inodes (number of files) that must be available in the front file system before a CacheFS file system can claim more than the files specified in minfiles. |
Typically, you should not change any of these parameter values. They are set to default values to achieve optimal cache behavior. However, you might want to modify the maxblocks and maxfiles values if you have some room in the front file system that is not used by the cache, and you wish to use it for some other file system. You do so by using the cfsadmin command. For example:
$ cfsadmin -o maxblocks=60 |
Creating and Mounting a CacheFS File System (Task Map)
Use the procedures in this table to create and mount a CacheFS file system.
Task | Description | For Instructions |
|---|---|---|
1. Share the file system to be cached | Verify that the file system you want to cache is shared. | share(1M) |
2. Create the cache | Use the cfsadmin command to create the cache. | |
3. Mount a file system in the cache | Mount a file system in a cache by using one of the following methods: |
|
| Mount a CacheFS file system by using the mount command. | |
| Mount a CacheFS file system by editing the /etc/vfstab file. | |
| Mount a cached a file system by using AutoFS. |
 How to Create the Cache
Become superuser on the client system.
# cfsadmin -c /cache-directory
cache-directory indicates the name of the directory where the cache resides.
For more information, see cfsadmin(1M).
Note - After you have created the cache, do not perform any operations within the cache directory itself. Doing so could cause conflicts within the CacheFS software.
Example--Creating the Cache
The following example shows how to create a cache in the /local/mycache directory by using the default cache parameter values.
# mkdir /local # cfsadmin -c /local/mycache |
Mounting a File System in the Cache
You specify a file system to be mounted in the cache so that users can locally access files in that file system. The files do not actually get placed in the cache until the user accesses the files.
The following table describes three ways to mount a CacheFS file system.
Mount Type for CacheFS File System | Frequency of CacheFS Mount Type |
|---|---|
Using the mount command | Every time the system reboots in order to access the same file system. |
Editing the /etc/vfstab file | Only once. The /etc/vfstab file remains unchanged after the system reboots. |
Using AutoFS | Only once. AutoFS maps remain unchanged after the system reboots. |
Choose the method of mounting file systems that best suits your environment.
You can mount only file systems that are shared. For information on sharing file systems, see share(1M).
Note - The caching of the root (/) and /usr file systems is not supported in a CacheFS file system.
How to Mount a CacheFS File System (mount)
Become superuser on the client system.
Create the mount point, if necessary.
# mkdir /mount-point
You can create the mount point from anywhere but it must be a UFS file system. The CacheFS options used with the mount command, as shown in the next step, determine that the mount point you create is cached in the cache directory you specify.
Mount a file system in the cache.
# mount -F cachefs -o backfstype=fstype,cachedir=/cache-directory[,options]
/back-filesystem /mount-point
fstype
Indicates the file system type of the back file system (can be either NFS or HSFS).
/cache-directory
Indicates the name of the UFS directory where the cache resides. This name is the same name you specified when you created the cache in "How to Create the Cache".
options
Specifies other mount options that you can include when you mount a file system in a cache. For a list of CacheFS mount options, see mount_cachefs(1M).
/back-filesystem
Specifies the mount point of the back file system to cache. If the back file system is an NFS file system, you must specify the host name of the server from which you are mounting the file system and the name of the file system to cache (separated by a colon). For example, merlin: /data/abc.
/mount-point
Indicates the directory where the file system is mounted.
Verify that the cache you created was actually mounted.
# cachefsstat /mount-point
The /mount-point is the CacheFS file system that you created.
For example:
# cachefsstat /docs
/docs
	         cache hit rate:   100% (0 hits, 0 misses)
	     consistency checks:      1 (1 pass, 0 fail)
	               modifies:      0
	     garbage collection:      0
If the file system was not mounted in the cache, you see an error message similar to the following:
# cachefsstat /mount-point
cachefsstat: mount-point: not a cachefs mountpoint
For more information about the cachefsstat command, see "Collecting CacheFS Statistics".